Quantcast
Channel: Let them have Polish!
Viewing all 283 articles
Browse latest View live

A England Dancing with Nureyev and Encore Margot

$
0
0
Hello everyone!! 

 My goodness!! It is already December 23rd!! I don't know about you guys, but this year has been a crazy whirlwind for me. It really feels like the Earth is spinning faster or something. I simply cannot believe that Christmas is right around the corner and the year is almost over. 
 So, as a blogger, I don't really get to actually enjoy most of the polish that comes my way. Meaning, I don't get to actually wear many of the polishes you see on this blog. More often than not, most of my polishes get swatched and stashed away for later wear or nail art use. That said, there are special colors here and there that I just KNOW I have to wear and enjoy. Enter the A England Ballerina Collection. If there is One thing that this brand has mastered is the ability to capture my heart by creating beautiful colors with even more beautiful inspirations behind them. 
 The Ballerina Collection features Four fantastic Holographic shades. They each have a very delicate feel with an intense linear holographic finish, and in some cases even a slight duochromatic look to them. For this manicure I chose to wear Dancing with Nureyev and Encore Margot
A england Dancing with Nureyev and Encore Margot photo DSCN3319_zps97e4c276.jpg
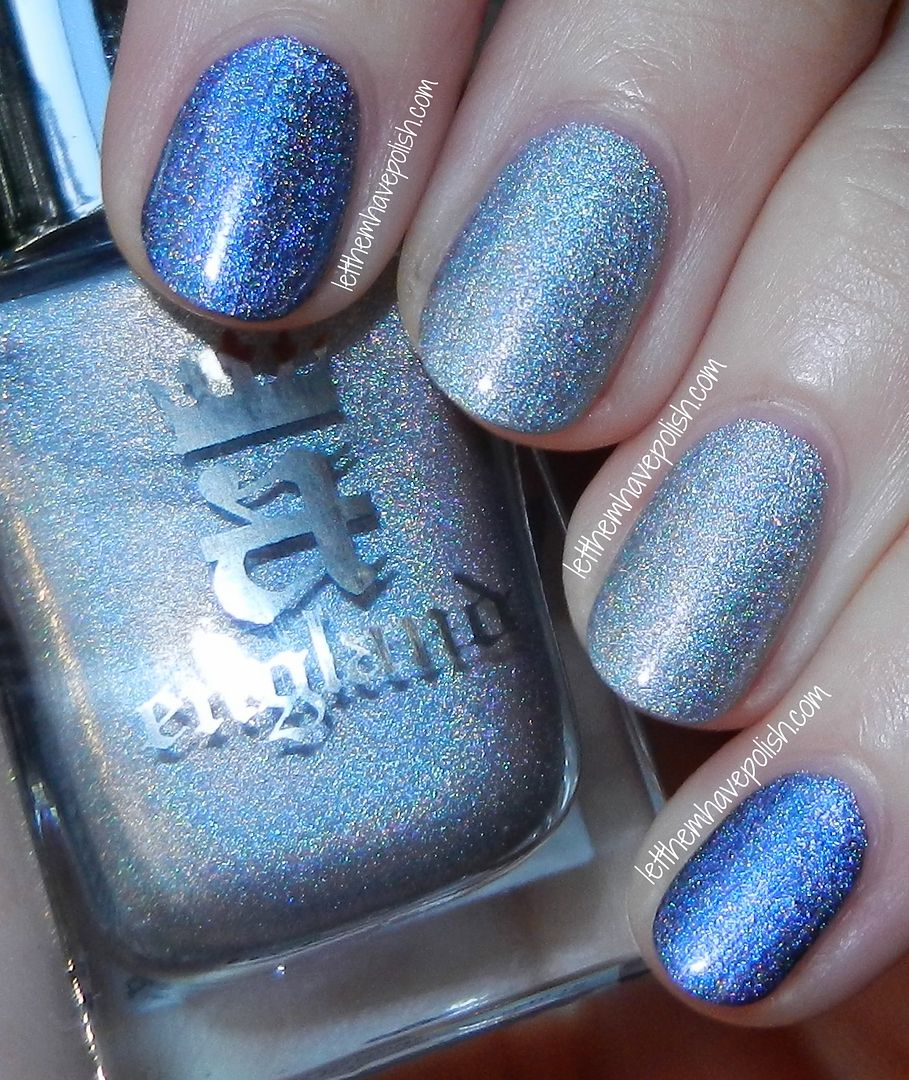
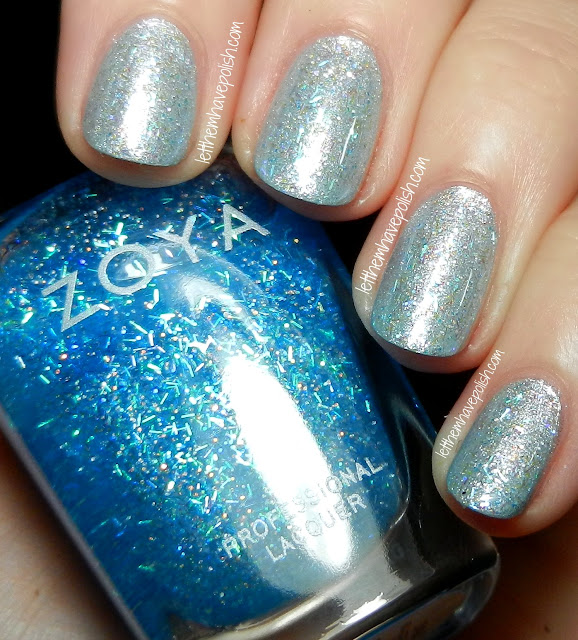
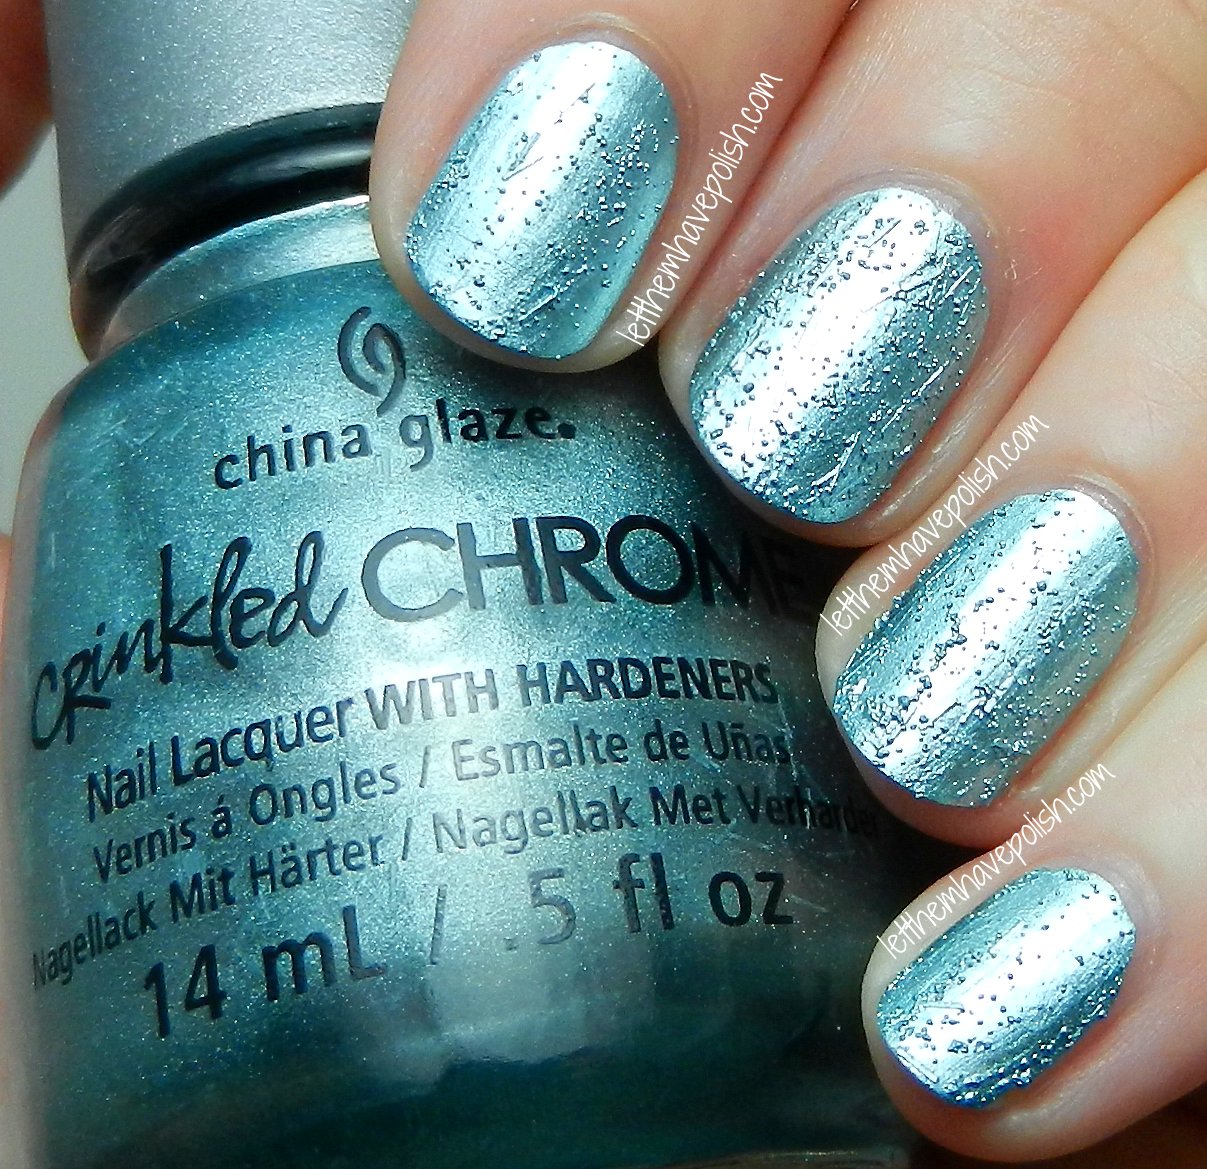
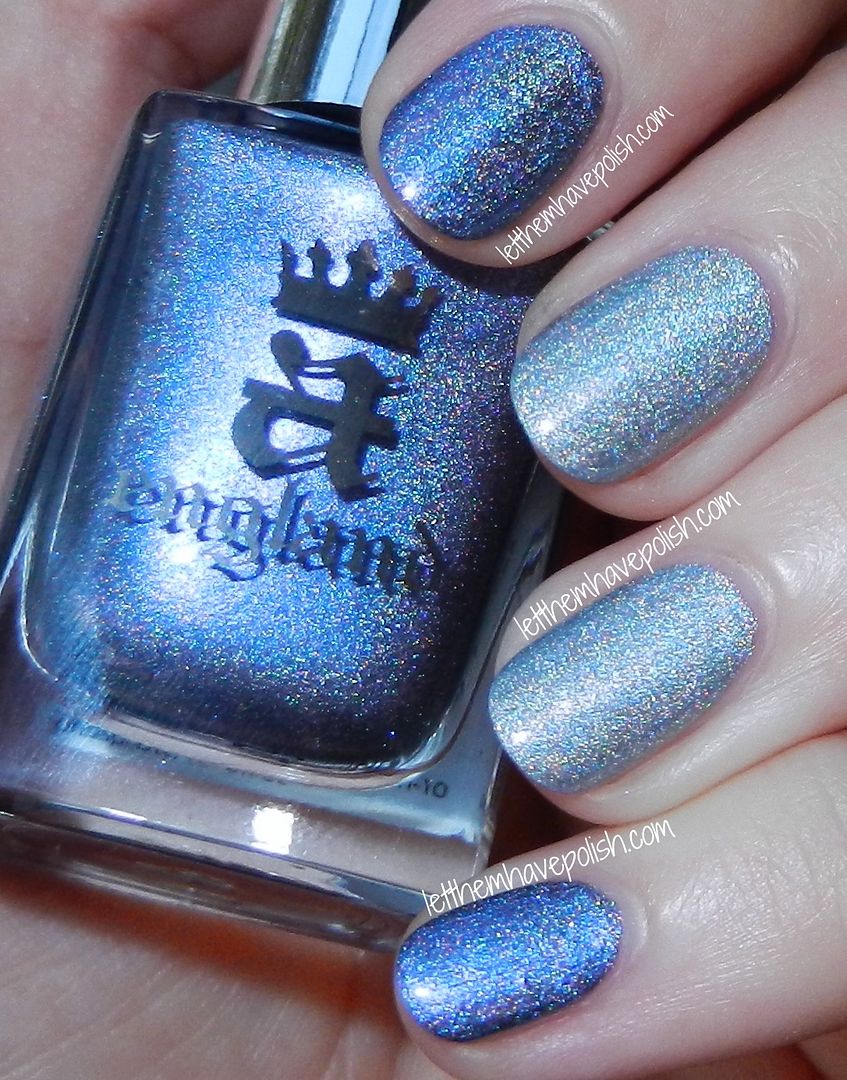
 In the photo above I am holding Encore Margot. This beauty is an outstanding shade of Silvery Ice Blue linear holographic. The formula was absolutely amazing, it could have practically been one coat but I used Two. I am always so amazed by A England polishes, but their holos take the cake. They are always buttery smooth and self leveling. The other amazing thing about these holographic polishes is that they wear like iron. 

A england Dancing with Nureyev and Encore Margot photo DSCN3327_zps48031272.jpg
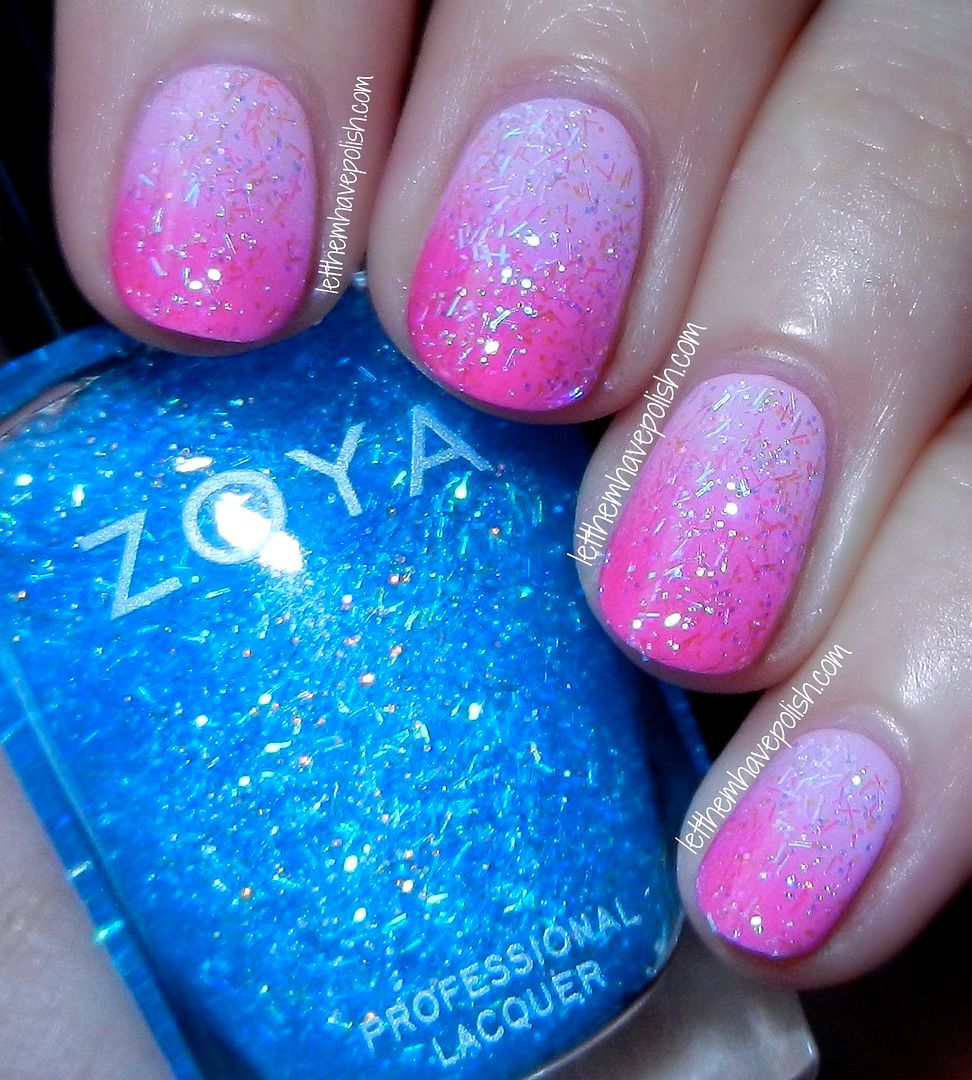
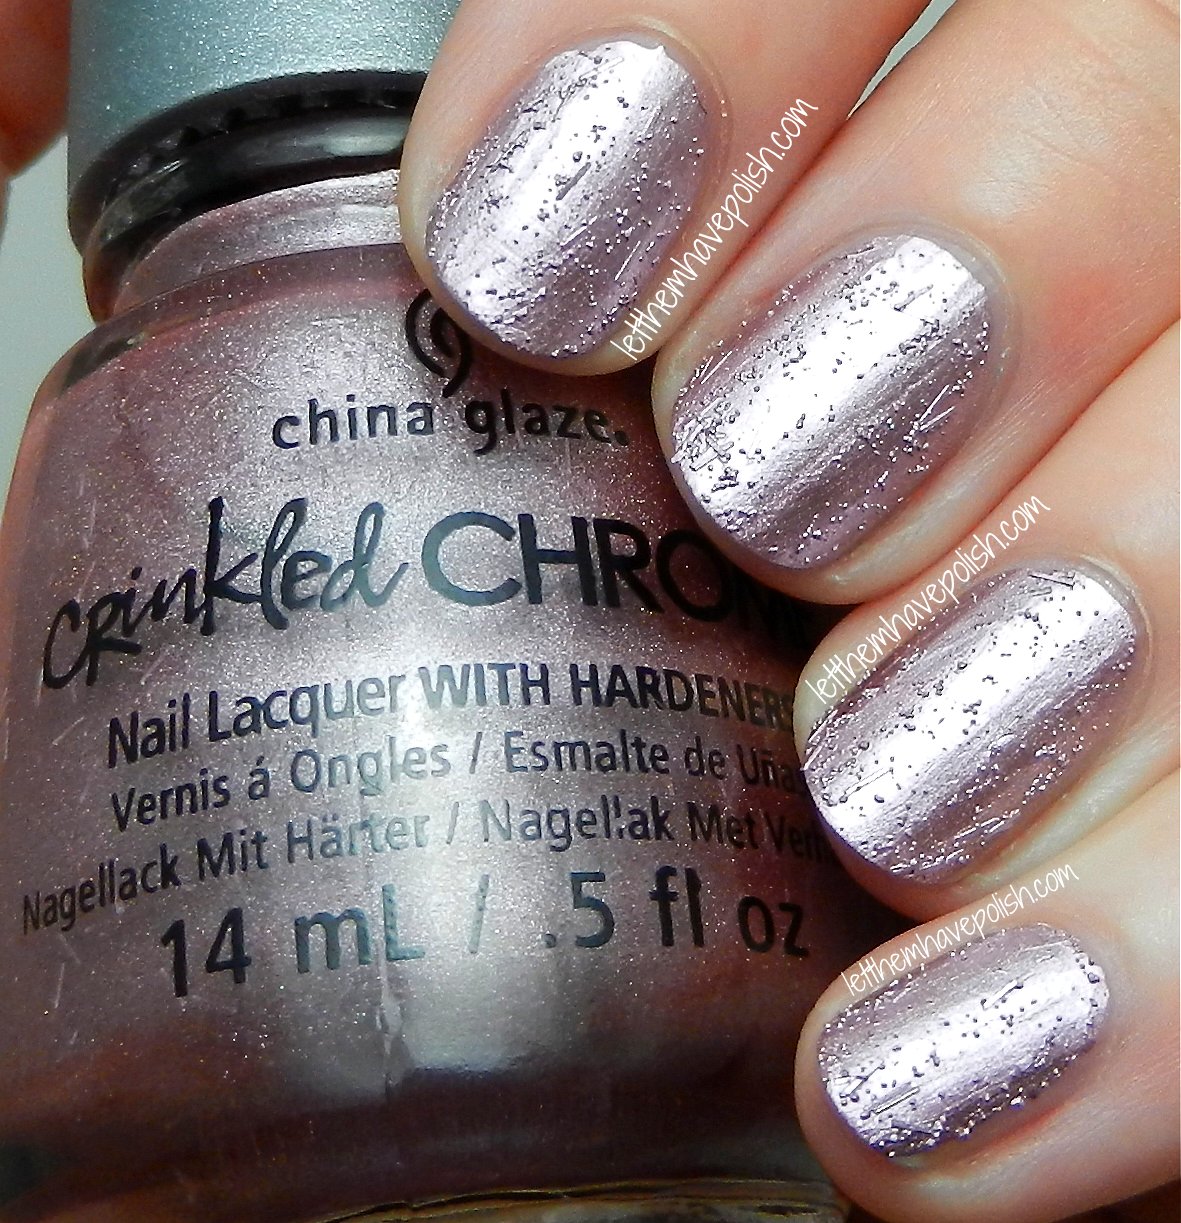
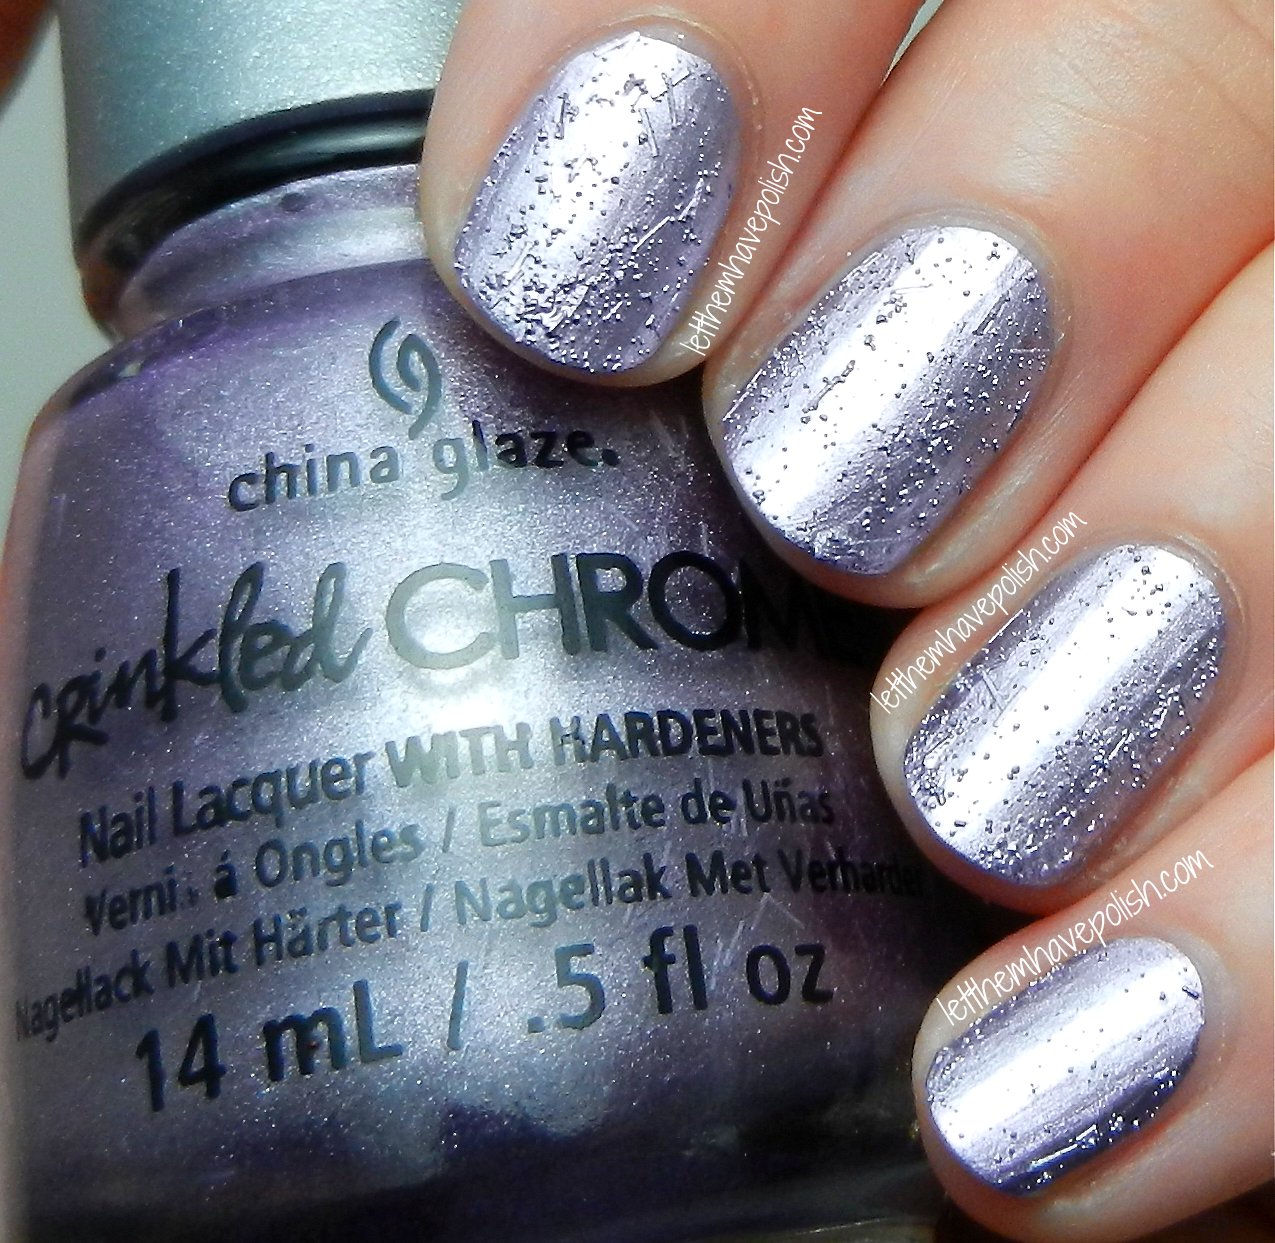
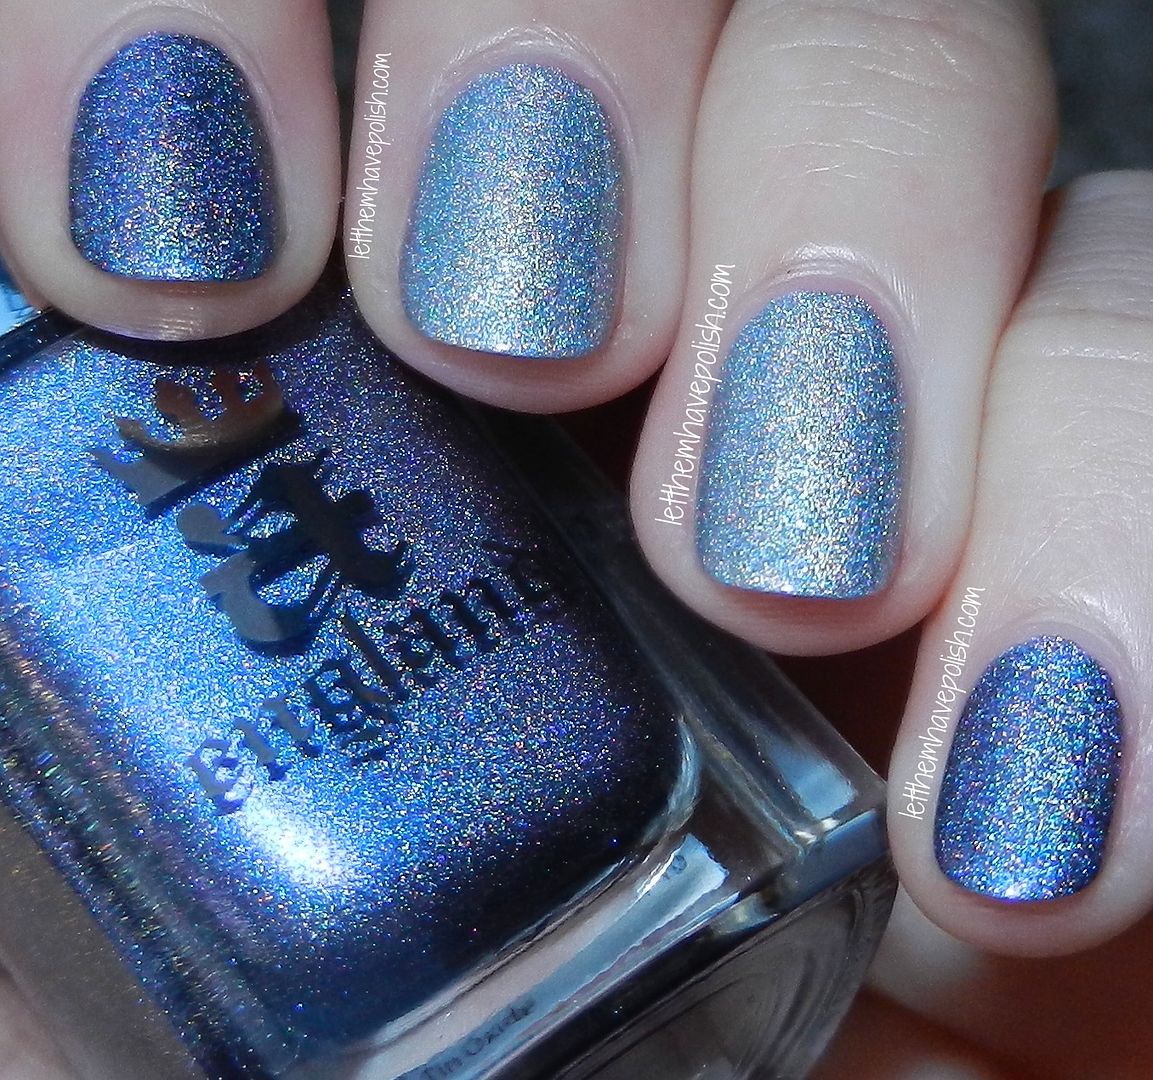
 In the photo above I am holding Dancing with Nureyev. This beauty is a light Sapphire Blue linear holo with a slight Violet duochrome. This beauty is so wintery and really just astonishing. This shade could have also easily been one coat, but I used Two. Another great thing about these two holo-pretties is that they look holographic in just about every kind of light. It is like they are made of nothing but micro holo particles. Many holos can be a let down if they are not in Sunlight, not these little gems. 

  All pictures were taken before applying a top coat. As you can see they are very shiny, even and smooth. Hooray for holos with great formulas!! One more great thing about these... Adding a top coat will not alter the holoness of them. The effect remains just as strong, even with top coat. That is always a worry for me when wearing holographic shades as top coats tend to mute the effect. 
A england Dancing with Nureyev and Encore Margot photo DSCN3332_zps230d938f.jpg
 I wore these for about Five days. In the end they started chipping because I was naughty and started picking at them. I'm sure if I had left them alone, they could have gone even longer. I spent most of the time moving my hands about to make little rainbows come out on my nails. Sometimes I forget how much I love a good holo, and A England delivered just that with this collection. If you are a fan of holographic shades you will fall in love with these pretties. 

 The A England Ballerina Collection is available now through various e-tailers and retails for $10/ color. 

 Today's mission is to get some rushed holiday nails put together hahaha. I seriously slacked this Holiday season. I'm not really happy about that, but I think I needed the break. I shall come back refreshed and full of new ideas. I have many goals for LTHP this coming year, such excite!! 

Now drool at the beauty that are Dancing with Nureyev and Encore Margot! ^.^ ♥. 

Obsessive Compulsive Cosmetics Fragmented Alice Collection- Nail Art Look

$
0
0
Hello and happy Monday everyone!! 

  Today I have a quick nail art post to share with you lovelies!! I hope everyone celebrating had a beautiful Christmas!! I don't know about you beauties, but this gal is sooo ready for 2014 to get here. 2013 was a weird year for me, extremely weird now that I think about it. I'm definitely ready to kick 2014's bum though.
 Today's look features the Two nail polish shades that Obsessive Compulsive Cosmetics released for their Fragmented Alice collection. This particular collection was inspired by the work of artist Gail Potocki. 
occ gryphon and severed photo DSCN4065_zpsfb5ec270.jpg
 The two shades featured are Gryphon; a muted Putty- Grey creme, and Severed a saturated and hot Coral creme shade. Both of these shades have absolute perfect formulations. I was incredibly impressed by the application of both colors. Both of these shades, Gryphon and Severed, are true one coat polishes. I could not believe how pigmented, yet smooth and self-leveling these two shades were. 
 For my nail art I went with a mixed look, these are AMAZING for nail art. I did some dotting, some splattering and some tape striping. I really loved how these Two colors played off of each other. In case any of you are wondering, my Thumbnail matched the Ring nail (splatter). To finish off my whole look I did a generous coat of KBShimmer Clearly on Top top coat. 

 The Fragmented Alice collection by OCC is still available online. The lacquers retail for $10.00. OCC brand can also be found in some Sephora stores as well as Sephora online. 

 Have you guys tried any OCC nail colors yet? If you have not, I highly recommend this brand (I am also a huge fan of their lip tars). I've yet to encounter a single shade with a bad formulation. Not to forget that their color range is amazing! They are all quite magical really. I fell in love with OCC lacquers during their Moderncraft fall release. I think this is a crush that will last a long time! Now... Grey and Coral forevaaaah!!!! I never knew this color combination could look so chic! 

Thanks for stopping by loves! 

Zoya Zenith Collection Swatches

$
0
0
(**Press Samples**)
Good morning and happy New Year's eve! 

  Today I want to share my swatches of the Zoya Zenith collection. As usual Zoya did an amazing, Six color, collection that perfectly captures the flash and sparkle of the Holiday season. I love that they can do this without creating colors that feel overdone or too typical. Brava for thinking out of the box Zoya! I was so happy to see Zoya revisit the holographic jelly- glassflecks, the painfully bright foils and the bar glitter glazes this year.
Zoya Zenith photo Feb62013_zpsf1217967.jpg
To see close up swatches, and have your retinas burnt by these amazing colors, continue reading ♥.
Zoya Cassedy
 Cassedy is described by Zoya as a celestial Pewter metal. I could not come up with a better description of this beautiful shade myself. In some lights it looks like a Graphite foil, in others it takes on a more Blue tone. As you can see it is an extremely bright and shiny foil finish, quite spectacular really. The formula is very easy to work with and did great in Two coats. 

Zoya Seraphina
Seraphina is an extremely unique shade. I was fully prepared to hate this color.... not entirely sure why. To my surprise, it ended up being one of my favorites from this collection. The best way I can describe this is as a Silvery- White or White-Silver. This baby is practically made up of micro shimmering particles and is also very bright and shiny. I can see any edgy bride wearing Seraphina. I used Two coats for my swatch. 

Zoya Dream
If you were a fan of Aurora and Storm from last year's Ornate collection, you will absolutely be needing Dream. Dream is a deep Cerulean Blue jelly packed with prismatic glassfleck and twinkling sparkle. This shade is soooo ridiculously sparkly that my camera had a bit of a spazz attack trying to capture it. This shade has a very smooth and even formula. I used Three thin coats for my swatch.

Zoya Payton
Along the same lines of Dream, we also have Payton. If you are into a classic vampy nail, but want a fun Holiday twist, Payton is the shade for you. I just love the rich shade of deep  burgundy of the jelly base. The holographic sparkle really bring this color to life. I used Three thin coats. 

Zoya Belinda
Belinda so linda! This shade is a Purple lover's dream. Belinda is a rich shade of deep Amethyst Purple. It is somewhere between metallic and smooth shimmer. Belinda has that "glow from within" quality that so many of us love. The formula on this shade is very impressive and practically applies itself. I used Two easy coats for my swatch. 

Zoya Mosheen
Mosheen is a fantastic bar glitter blend. I don't know how many of you remember the Gems collection from 2011 (or Elektra from last year's collection), but I love that they revisited the concept of bar glitter glazes. Mosheen is made up of densely packed icy Sky Blue iridescent glitter and bar glitter in a, barely-there, light Blue jelly base. This glitter topper is winter magic over any shade you layer it over. I used just one coat of Mosheen over my base colors. Mosheen dries a bit matte and lumpy so a good top coat is a must. Shown here with a top coat of Seche Vite.  
Zoya Mosheen over Zoya Dream
Zoya Mosheen over Zoya Seraphina
 photo ZoyaMosheen_zps66b6b72c.jpg
Zoya Mosheen over a gradient of Barielle Pink Flip Flop and Cosmic Kiss
 As usual I am in love with each and every single shade. I have a great appreciation for Zoya's ability to make Holiday polishes that always feel unique, to me at least. I love that there is a little bit of classic, a little bit of flashy and a little bit of playful in such a small release. 

Which of these pretties were/are on your Holiday wishlist? Have a safe and happy new year's eve everyone!!! 

Zoya Odette- Glequin Gradient Nail Art Look

$
0
0
(**Press Sample**)
Happy new year my beauties!!!

 If you follow LTHP on Facebook, you may have seen a post about some blogging goals I have for this new year. One of those goals is to master the art of glequin placement. I have a huge level of admiration and respect for the amazing nail artists who have mastered this technique. While glitter placement isn't necessarily hard, it is very time consuming. Glitter placement requires a lot of patience, a steady hand and precision. The finished looks are always beautiful and eye-catching. In the spirit of the new year and sticking to my goals, I jumped right into this glequin gradient manicure. The placement isn't precise on all my nails, and I could definitely use some practice... but I do love this look so much!
Zoya Odette Look photo DSCN3690_zps46409658.jpg
 For this glequin gradient I started with a base of Zoya Odette. Once my base color was fully dry I started working on the loose glitter placement. I did a coat of a slow drying base coat over my dry base color and set the glitter onto that. I forget where I got my glequins from, I want to say it was Born Pretty Store. They definitely have an AMAZING range of loose nail art glitter. For my gradient I used a Rosy Pink glitter, a light Lilac glitter, a Sky Blue glitter and a Cobalt Blue glitter. To finish the look off and smooth out the surface I did Two coats of Seche Vite top coat. 

 While I am not 100% happy with my placement, I do like the finished look. From further away the mistakes in my placement were not as obvious. I will admit, this was rather time consuming, but therapeutic in a sense. I highly recommend that you guys visit [THIS BLOG] for impressive examples of glitter placement manicures.

Happy 2014 and thank you for stopping by!

Zoya Naturel Collection Swatches

$
0
0
(**Press Samples**)
Good afternoon my pretties! 

 Who else is kind of glad that the Holidays are over? Don't lie... You know you are hahah. In my case the Hoidays are also laced with many birthdays, I'm celebrated-out. And I still have my birthday coming in 14 days. Yikes! 
 You know what else is nice to get a break from? Glitter polishes! I LOVE glitter. I love that the Holidays usually inspire many glittery nail polish shades. It is a great thing. That said, I am always glad to have a break from all the flash.
  Say hello to the Zoya Naturel Collection. This was Zoya's last release of 2013. Perhaps, they were inspired by the success of recent "Naked" eye palette releases when thinking up this soft, creamy color range. These shades may not be everyone's thing, but there is a nude here that will suit any skin tone. 
Zoya Naturel photo ZoyaNaturel_zps8c61fbd7.jpg
 The Naturel collection is made up of Six new, full- coverage, nude creme tones. To see close up swatches and find out more about these shades just continue reading. 

 I was really impressed with the formulas of every single shade. With nudes I always expect to run into a problem shade here and there, especially full- coverage nudes. Lo and behold, every color had a very smooth and self- leveling formula. They were all just thick enough to cover completely, but smooth enough to spread evenly and smoothly. I used Two coats for every color. All swatches are shown with a top coat for full shine. 


Zoya Chantal
 Chantal is described by Zoya as a French Vanilla creme. I was worried this shade would lean too Yellow and make me look red. My worries were for nothing. 
Zoya Chantal photo DSCN3426_zpsba7265c6.jpg

Zoya Taylor
 Taylor is described by Zoya as a light Toffee creme. This shade has just a bit more Brown to it than Chantal and may be easier to wear for more skin tones.  
Zoya Taylor photo DSCN3483_zps8d161a9e.jpg

Zoya Rue
Rue is described by Zoya as boudoir Blush creme. ???? Huh? Anywho, this shade is a very light nude with slight Rose undertones. Think of it as the lightest Nude-Mauve you've ever seen. As you can see, very "mannequin hands" on me. Not bad though. 
Zoya Brigitte photo DSCN3541_zps10646aae.jpg

Zoya Brigitte
 Brigitte is described by Zoya as a Bombshell Mauve creme. And we are back to rational descriptions haha. I think Mauve creme is pretty dead on for this shade. I really liked this particular color. The formula was a bit crelly which gives Brigitte a squishy finish. 
Zoya Rue photo DSCN3610_zps69fec8f0.jpg

Zoya Odette
Odette is described by Zoya as a sultry Orchid Maroon creme. Odette is one of my favorites in this release. I love a smoked out, light Plum. It is basically Grey- Purple- Perfect. 
Zoya Odette photo DSCN3665_zps7aa9f8f7.jpg

Zoya Normani
Normani is described by Zoya as a Sable Mauve creme. This shade is the holy grail of neutral cremes. You know? Those creamy, Grey-Putty shades that flatter anyone and look good in any season. Yeah, I love Normani. She is classic and perfect. 
Zoya Normani photo DSCN3733_zps2de58f17.jpg

 These are like foundation for nails. Even though there are no remarkably unique shades, there is a nice range of neutrals for many different tastes. They created a lovely palette cleanser palette haha. The Naturel Collection is available from zoya.com now and retails for $9.00/ color. 

Which of these would best suit you? 

Zoya Chantal- Stamped Nail Art Look

$
0
0
(**Press Sample**)
Happy Friday! 

  Today I have a short and sweet post. I didn't do any resolutions for 2014. I don't think a new year is an excuse to be better to myself, for myself. I think we should do that all the time.. What I did do was set some blogging goals instead. One of my goals is to get back to my nail art. I feel like in the past year I really stepped away from what I love most about doing nails, and that is nail art. I decided to start off by getting back into nail stamping. Stamping was my first nail art love, and will always feel like "home" to me. I've been on a "stamping on nudes" kick lately. I just love how edgy crisp and bold stamps look over a nudey base. 
Zoya Chantal Look photo DSCN3460_zps867b2d13.jpg
 For this simple look I started with a base of Zoya's Chantal. For the stamped design I used Red Angel plate RA108 and Konad Black special polish. I felt a little rusty while I was stamping, but ultimately loved this look. I topped my nails off with some Seche Vite and followed that with INM Northern Lights to give my nails a touch of sparkle. 

 Do any of guys set any beauty,  blogging or nail goals for this year? I am determined to make 2014 a great year. Thanks for stopping by and happy Friday my beauties! 

Zoya Dream and Mosheen- Snowy Stamped Nail Art Look

$
0
0
(**Press Samples**)
Hello and happy Monday!! 

 If you are celebrating today; Feliz Dia de Los Reyes! Today I have another simple look featuring some stamping. Living in Florida, it can be hard to get into the Winter swing of things. But I was in the mood for something "cool", sparkly and snowy. If I can't have snow on the ground, I shall have it on my nails!
Zoya Dream and Mosheen Look photo DSCN3990_zpsb526001c.jpg
 This sparkly look started with a base of Zoya's Dream. To give my look an extra dose of sparkle I layered Zoya Mosheen over Dream. I then top coated my base and waited for it to dry before stamping. For the snowflake stamps I used Bundle Monster plate BM323 and Konad White special polish. The final step was to top coat my snowflakes with a coat of Seche Vite. 

 I am just madly in love with Mosheen. It looks magical over anything and really add just the right amount of beautious sparkle to any manicure. I just love how the snowflakes look as if they are floating on the surface. 

Thanks for stopping by my beauties! 

Zoya Normani and Inglot Pro Perfection Glitter Stripes Nail Look

$
0
0
(**Press Samples**)
Good morning!! 

  Today I have a simple look featuring some Inglot Pro Perfection glitter striping polishes. Some time ago Inglot released an amazing range of striping glitter polishes and I was lucky enough to receive them for review. For this look I decided to revisit an old manicure of mine from 2011. I wanted to keep it simple because I love the classic beauty of Zoya's Normani. The glittery stripes were the perfect touch to spice up my Greige base. 
Zoya Normani Look photo DSCN3781_zps979880e2.jpg
 This simple look started with a base of Zoya Normani. Once my base was dry I  did my glitter stripes. I used Inglot Pro Perfection glitter stripers in #66 which is the Gold- Holographic glitter, and #92 which is a Black and Silver glitter. On my Pinky and Ring nail I did full stripes, and on my Index and Middle I did falling stripes. I finished my look off by top coating my nails with a generous layer of Seche Vite. 
  The Inglot Pro Perfection stripers come in a beautiful range of glitter mixes and retail for $10.00. I kind of wish they had also released some of them as regular glitter polishes. They are densely packed with sparkles and are just amazing. The only issue I have is that the brush is not very fine or easy to control (for me at least). That is the only downside I could think of with these babies. Nothing using my own stripe brush cannot fix. 

 Even tough this is a simple look I really love it because I can still enjoy the beauty of Normani without being too distracted by the nail art. 

Thanks for coming by! 

BH Cosmetics Party Girl Palette- "Brown Eyed Girl" Look feat. Pinky Paradise Geo X-tra Bella Brown Lenses & Maybelline Hot Plum

$
0
0
(**Press Samples**)
Happy Humpday!! 

 For today's post I want to share this eye look I did using my BH Cosmetics Party Girl Palette. So, my natural eye color is a light Green. Sometimes they can look a bit more blue, sometimes a bit more icy Green. Therefore, I rarely wear Green eye makeup. I feel like Green eye makeup washes my eye color out. That is not to say that I don't love Green eye makeup. I think it is a beautiful color, and probably one of my favorite colors all around. 
 Enter my Pinky Paradise Geo Xtra Bella Brown circle lenses. I just love the look these lenses give my eyes (full face shots can be seen on my Instagram account @L_T_H_P). They add just the right touch of Brown, which makes my eyes look Hazel from further away. These Geo Bella Xtra lenses are some of my favorites. They give this dolly look that I am a complete sucker for. So anywho, with my newfound "Hazel" eyes I saw a window of opportunity to rock some Green makeup. So I did just that :D. 
 photo BHcloseup-1_zps12158c1b.jpg
 Since this look was done with a 40- color palette, non of the shadows used have actual names. I prepped my lid with an eyeshadow primer and proceeded to work with my BH Cosmetics Party Girl palette. I stuck to a softer color palette for a slightly smokey look. I found these shadows to have a smooth consistency. Some of the lighter Greens were a bit "dusty" and required extra layering of product to get some good color payoff. The Brown and more neutral shades I used on this look were all fantastic and have great pigmentation. 

 Since I can't name the colors, I went ahead and marked them with an asterisk on this image I got from the BH Cosmetics site. For the cateye I used Jordana Jade Jewel 12 hour eye liner. For my waterline I used Jordana in Espresso Last. For my lashes I used Ellis Faas Black mascara. I forget what I used on my brows :S.
 photo cedcbf4b-9ddb-4751-a3e2-a89a3e0146bd_zpsa42df23a.jpg

 And as a "bonus" here is the lip color that went with this eye look. This is Maybelline Hot Plum from their Vivids collection. On this particular day I prepped my lips with the Obsessive Compulsive Cosmetics clear lip tap and then applied my lip color over it. I am so madly in love with this shade of lipstick. While it is a very vivid shade of Purple I still find it wearable as it has enough Pink to take it out of Goth territory. 

 Is there a color family that you love to see on other people but don't care for on yourself? I think for me, it will always be Green. I don't have a problem slapping on every other color on my face, but Green tends to make me nervous. That said, with the aid of my beautiful Brown lenses I feel much more comfortable going into Green makeup looks. I can't wait to play around with this palette some more. I think it has a great color and finish range.

Thanks for stopping by today! 

Nicole by O.P.I Carrie Underwood Collection Ruffian Nail Art- Featuring Fisher Queen & Get Carrie'd Away

$
0
0
(**Press Samples**)
Good morning and happy Thursday! 

 Today I have a quick and simple nail art look featuring some of the new Carrie Underwood collection shades from Nicole by O.P.I. I love the simple elegance of ruffian manicures. I knew immediately that I wanted to do a ruffian with these two shades. There is something about Gold and Purple together that looks so opulent and classic, it just felt right.  
Ruffian look with Get Carrie'd Away and Fisher Queen photo DSCN4358_zps62e34f4d.jpg
  This look started with a base of Get Carrie'd Away. I used Three thin coats of this color to have a nice, sparkling base. For the Purple ruffian portion I used Fisher Queen. This shade is a beautiful deep Amethyst Purple shimmer. Ruffians are very easy and quick to achieve. I freehanded my ruffian with the nail color brush. To finish the look I top coated with Seche Vite.

Nicole by O.P.I Get Carrie'd Away
 This color though! Get Carrie'd Away is a spectacular mix of bright Yellow- Gold and White Gold sparkling glitter/flecks. The particles are small, but SO reflective. The formula on this shade is nice and easy to work with. This shade could be layered or built up to opacity. I used Three thin coats for my base. This shade dries a with a slight texture, which looks pretty neat. I did use a top coat for my look though, as I wanted sparkle. 
Get Carrie'd Away photo DSCN4339_zpsb7121767.jpg
 The Carrie Underwood Collection from Nicole by O.P.I should be popping up in retailers now, and retail for $7.99. I am very impressed with this collection. I was also very inspired by these colors and decided to do nail art looks with them instead of swatches. I can't say I am a Carrie fan. I only kept up with her during American Idol. But, I absolutely adore what they have done with this collection. The colors are adorable and cover a wide range of tastes. I was not expecting to love them as much as I do. This may be one of my favorite NO.P.I collabs to date. 

 Have you spotted any Carrie colors? Which sang to you (no pun intended)?

China Glaze Crinkled Chromes Collection Swatches

$
0
0
(**Press Samples**)
Happy Friday everyone!! 

Two words: Crinkled Chromes... What? I can't recall a collection causing so much conflict within me since.. ever. When I first read about these a few months back, I was slightly confused. I could not wrap my brain around the concept of a textured chrome. How would they go about this? It looked awfully weird in my head. This meant that I just HAAAAAD to see them in person and try them for myself. I didn't care that hating them was a possibility because the concept was so new and weird, I needed to see in action on my nails. 
China Glaze Crinkle Chromes photo CrinkleChromes_zps421f2ec8.jpg
 To see closeup swatches and find out more about the China Glaze Crinkled Chromes collection just keep on reading. 
 My first encounter with these was a few weeks ago at my local Sally Beauty Supply. I had nail polish on so my husband graciously allowed me to paint a racing stripe on his thumbnail. At first glance, I was perplexed by everything about the polish. The texture looked weird, it had bar glitter and some brushstrokes going on.... Um, no thanks... But then, a few hours later, he showed me the completely dry stripe and I was actually fairly amused by the look and decided I did want to try them out for sure. 

 All my swatches are just One coat of color. The formula on these is a bit thick, but actually manageable. The pigmentation is out of this world and I really did not see a need for a second coat. I also found the texture effect to be much cooler with just One coat. I tried two coats and just did not care for the look at all. Adding a second coat gave more texture. The issue I had was that it looked like chrome cottage cheese on my nails.  I did not top coat any of these. Adding a top coat over these is fairly pointless as the Chrome base does not necessarily dry matte, it just dries extremely metallic. These also dry fairly fast, which is great.

China Glaze Aluminate- Bright Silver chrome/ metallic base with texture particles as well as Silver bar glitters. 

China Glaze Don't be Foiled-  Bright Aqua chrome/ metallic base with texture particles as well as Aqua bar glitters. 

China Glaze Iron Out the Details-  Bright Steel-Sky Blue chrome/ metallic base with texture particles as well as Steel- Sky Blue bar glitters. 

China Glaze I'm a Chromantic-  Bright Rose chrome/ metallic base with texture particles as well as Rose bar glitters. 

China Glaze Crush, Crush, Baby-  Bright Lilac chrome/ metallic base with texture particles as well as Lilac bar glitters. 

China Glaze Wrinkling the Sheets-  Bright Mint Green chrome/ metallic base with texture particles as well as Mint Green bar glitters. 
 I think with the exception of Iron Out the Details, all of these shades have China Glaze "ancestors". I kinda wish I had been involved heavily in nail polish when China Glaze did their original, smooth chrome collections. Those were beautiful, as well as amazing stamping polishes. So the question begs to be asked.... Will these work for stamping? I'm not holding my breath for it, but the adventurer in me wants to find out. 

 So does this mean I actually kinda dig these? I can honestly say that yes, I do like them (I was fully prepared to loathe them). They are still growing on me, but I do think that they are pretty neat. They are like robot skin. I know robots don't have skin, let's use out imaginations here haha. The chrome effect is superb and thanks to the texture particles there doesn't seem to be a whole lot of brushstroke action going on once the color is fully dry. As far as application tips all I can say is keep a light hand and move slowly to get a good spread of texture particles. These are not as heavily packed with textured bits as other texture polishes out there. I still need to test out the wear on these and if they will snag on clothes or hair. 

 The China Glaze Crinkled Chromes are available now at Sally Beauty Supply, Ulta etc. Have you or will you be giving any of these a go? They are definitely not for everyone, that is for sure ;). 

Nicole by O.P.I Carrie Underwood Collection Sweet Glittering Gradient Nail Art Look

$
0
0
(**Press Samples**)
Good morning! 

  I hope everyone had a nice weekend. Mine was pretty mellow, and reeeeeally warm. Florida is hell bent on making me sick with all these weird and sudden climate changes haha. Anyhow, today I want to share this sweet look using Three of the shades from Nicole by O.P.I's Carrie Underwood collection. Something about these colors brought together like this seems very Valentine's to me. That was purely accidental :D. 
ILMP, American as Apple Pie and Lips are Dripping Honey photo DSCN4427_zps3fbe7804.jpg
 For this look I started with a base of Love my Pups. Once my base color was dry I proceeded to work on my gradient using Love my Pups and American as Apple Pie. American as Apple Pie is a beautiful shade of bright Red with some slight Pink undertones. It is definitely more on the Blue toned family and it has a really nicely saturated formula. When sponged on for my gradient it created a gorgeous blushing effect on the tips of my nails, which is exactly what I wanted. 
 To give my gradient some pizzas I then went back and lightly sponged Lips are Dripping Honey over the Red portions of my gradient. Lips are Dripping Honey is a beautiful glitter topper made up of prismatic Gold hexes, soft Pink iridescent hexes and small prismatic glitter suspended in a clear base. I am absolutely head-over-heels in love with this glitter. To finish my look I off I added a top coat of Seche Vite. 

My base color Love my Pups is a delicate shade of soft Ballerina-tights Pink. The consistency of this color is really nice and crelly. I did not have any issues with application and had a good opaque base at three thin coats. This color can also make a great base for French manis if left at One or Two coats. I love this color because these are my go-to lazy colors. I just love how dainty and healthy colors like this make my hands look. 
I love my Pups photo DSCN4385_zpsb30aca7f.jpg
 My birthday is right around the corner and I still have not the foggiest idea of what I will be doing with my nails for the occasion. I am definitely open to suggestions :D. 

Thanks for stopping by today! 

Zoya Brigitte- Stamped Nail Art Look

$
0
0
(**Zoya Press Sample**)
Good morning and happy Tuesday! 

 Today's look is something dainty, feminine and totally not me haha. There is really not much to say about this manicure. I wanted to do something with a vintage and delicate feel. I went with one of my Zoya Naturel collection shades. I chose Brigitte,  she was one of my favorites in the collection. 
Zoya Brigitte Look photo DSCN3648_zps6328f727.jpg
 For this look I started with a base of Zoya Brigitte. I went with a floral and lacey stamp from one of my Pueen stamping plates. This design is from the Love Elements plate set, Pueen47. For my stamping color I went with China Glaze Passion. I topped my nails off with some Seche Vite to protect my stamp and the did a final coat of Twee & Honey This is Mate-ness matte top coat to give the Golden stamp more presence. Somehow making the metallic Gold matte made it jump out even more. 

 For my review of the Zoya Naturel collection visit [THIS LINK]. I purchased my Pueen stamping plates on amazon.com 

Thanks for stoping by! 

#AwesomeNailsAreAwesome! Guest post from Laura of Polish All the Nails

$
0
0
Hi everyone!!

 Today's post is a special Humpday treat. A few weeks ago I did a glitter placement manicure and I had linked back to one of my favorite bloggers, miss Laura of Polish all the Nails. She does AMAZING glitter placement manicures that always manage to leave me speechless. Her patience, precision and creativity are a force to be marveled at.
 I was beyond ecstatic when Laura offered to do a guest post for me. I desperately wanted to share her amazing art, but I could not bring myself to ask her for a guest post.. silly, right? I mean, I know how time consuming these types of manicures can be... I was so honored and excited that she wanted to do a look for me. I shall consider this AMAZING manicure from miss Laura an early birthday present :D (I turn 27 tomorrow o.O).

I give you, the amazing Laura!!
 ------------
Hi everyone!  I'm Laura and I blog over at polishallthenails.com and I'm so happy that Cristina agreed to let me do a guest post for her.  She does the most fabulous work and I'm so proud I could contribute a mani.  I'm best known for pretty complex glitter placements so course I had to one for LTHP.
 photo unnamed-4_zps001e827f.jpg
After a few days of experimenting and brainstorming, I decided that I should do a rainbow glitter placement using matte square glitter.  It may look complicated but there is a system involved.  First, I applied two coats of Urban Outfitters Blue Velvet.  When using small glitter like this, it pays to keep your base colour thin and an even, otherwise it will be more difficult to place the glitter.  Starting with my thumb, I applied a thin stripe of top coat down the centre of my nail and laid down a column of glitter using an orange stick.  Pay attention to the spacing in this first column as it will set out the spacing for the rest of the nail.  Working in columns and reapplying top coat as needed, I filled out each side of the nail.  Once complete, add two coats of Seche Vite and you're done!  
The Verdict: I'm really happy with how this mani came out.  It has rainbows - my favourite - and neat, even rows of glitter - also my favourite.  I'm just happy I could contribute just a little glitter to Let Them Have Polish.  Thanks again Cristina!
-----

 No, THANK YOUUUU miss Laura! I really hope you guys enjoyed this fantastic manicure. I hope I can continue to develop my skills in glitter placement. Laura is definitely a huge inspiration. I don't know if I will ever have this kind of patience. Until then, I shall marvel at Laura's skills and continued creative use of loose glitters.

Where to stalk.. er.. follow Laura: [Facebook] [Twitter] [Tumblr].

Thank you guys for stopping by!

LTHP's Crazy Birthday Nails! Turning 27 in Rad Nails

$
0
0
(**Press Samples**)
Hi everyone and happy Thursday! 

 Today is my birthday! I will be keeping my intro short and sweet today. I'm allowed to slack a little on my special day, right ;)? Anywho, I wanted to do something kind of crazy and all over the place on my nails... So that is exactly what I did haha. 
 photo DSCN4864_zps2611b312.jpg
 I think it is easier if I break this look down by nail since there is so much going on. There was really no rhyme or reason behind any of this manicure. I just kind of winged it and ended up with this crazy look that somehow seems to work.
- Index and Ring nails: Gradient with Milani Cupid's Touch and Aqua Brisk. The glitter over Aqua Brisk is China Glaze's Your Present Required. My Ring fingernail is the same thing, just inverted. I REEEEEALLY love how these gittering gradient nails turned out. 
- Middle nail: For the base I used Cult Nails Tempest. For the splatter part I used Bettina Pink Bikini, Hopeful and Cult Nails Nevermore
- Tumb and Pinkie nails: For the base I used China Glaze Put a Bow on It. I then did a dotted gradient using China Glaze Mingle with Kringle, Cult Nails Tempest and Nevermore

 I topped all of my nails off with a top coat of KBShimmer Clearly on top. On my Index, Middle and Ring nails I also did a coat of INM Northern Lights for some extra sparkle. I kind of like the "multiple personality" thing this look has going on, very me haha. 

 I'm off to celebrate turning 27 with my crazy nails!! Thanks for stopping by today! 

Cult Nails All Access/ Fall 2013 Collection- Nail Art Look

$
0
0
(**Press Samples**)
Hello and good morning! 

(*EDIT*): I feel like I have to mention this. Cult Nails has NO association with CULT Cosmetics. They are two different companies. Cult Nails has been around since about 2010 if memory serves me right. This Cult Cosmetics has only been around a few months but they have practically committed identity theft. Even going as far as pitching to bloggers using the Cult Nails tagline "join the cult". I don't even know what to say about it other than I think it is a rotten thing this new company is doing.
 I admire originality, people who work hard and know their industry... So the fact that they appear to not have done any research before launching their brand, using someone else's "identity" in a sense.. leads me to believe that the people behind Cult Cosmetics are just looking to make a quick buck of the "nail trend" and are not actually into it because they want to be innovative. Read Maria's thoughts on the situation [HERE].

 Today I want to share this look I did using all Five shades in Cult Nails' All Access Collection. This collection was released back in 2013 for Fall-ish. The collection has a 90's grungy feel, and that pleases my inner 13 year old in the best way possible. In this collection Maria did Three new cremes and two shard- glitters. I really wanted to bring them together in a flashy look and this is what I ended up with. Such lush! Much sparkle!
Cult Nails All Access Collection Nail Art Look photo DSCN4699_zps4b708aa6.jpg
  As I mentioned above, this look uses all Five shades in the All Access Collection. The only color I did not do nail art over was Cult Nails Disillusion. Disillusion (on my Ring finger and Thumb) is a Black jelly base packed with Magenta shard glitter. The formula on this shade was a bit tricky. It was a bit thick and needed slight manipulation. I built it up to opacity by using Three coats. I think this shade is best layered. On my Index finger I used Cult Nails Lamestain as my base. This shade is deep, vampy burgundy creme-jelly perfection. As an accent I used a cosmetic sponge to do a gradient using Cult Nails Feedback which is a beautiful blend of Golden/Iridescent shard glitters in a clear base. 
 On my Middle nail I used Cult Nails Wackslacks as my base. For the peacock feather design over my Middle nail I used Pueen stamping plate Pueen09 and China Glaze Passion. On my Pinkie nail I started with a base of Cult Nails Grunge. This shade is easily my fave in this collection. Grunge is a beautiful shade of muted moss green with the signature Cult Nails smokiness. I accented my Pinkie by doing a reverse dot gradient using Wackslacks. To finish off I did a coat of Cult Nails Wicked Fast top coat. 

 It goes without saying that the cremes in this collection are flawless. Wackslacks could have practically been one coat, I did two out of OCD. Lamestain glides on like butter and is perfect in Two coats. Grunge is also a dream as it is opaque like a creme but applies like the best crelly you've ever tried. The glitters are not hard to work with, they just require a bit more patience as they are SO packed with glitters.
Cult Nails All Access Collection photo DSCN4666_zps929becfe.jpg

 I wore this look for about Five days. When the time came to change my nail color, these were still holding on for dear life. I will never cease to be amazed by the wear of Cult Nails nail polishes. The Cult Nails All Access shades are still available from the Cult Nails site as well as Beautylish. They retail for $12.00. 

You can follow Cult Nails on [FACEBOOK] [TWITTER] [INSTAGRAM] [PINTEREST]. I am VEEERY excited to see their upcoming collection, Passionate Dreams. This collection is already available for pre-order through Cult Nails

Thank you for stopping by ♥! 

Nicole by O.P.I Carrie Underwood Collection- Sing you Like a Bee & Backstage Pass- Elegant Half Moon Nail Art Look

$
0
0
(**Press Sample**)
Good morning and happy Tuesday! 

 I am so in love with today's look.. I think I will let the photos do the talking for me :D. Anything more seems like rambling. 
NOPI Sing you Like a Bee and Backstage Pass Look photo DSCN4629_zps22532ff6.jpg
 This simple, yet classy look started with a base of Nicole by OPI Sing you Like a Bee from the Carrie Underwood collection. Once my base color was dry I did half-moon details on my thumb, ring and pinkie nails using Backstage Pass. Backstage Pass  is a beautiful shade of deep Oxblood with sultry shimmer. To accent my half moons and "blank" nails I used Copper stones from Cult Nails set into my wet top coat (Seche Vite). The stones brought this look to life for me. 

 Sing you Like a Bee is a stunning shade of dense White shimmer with a strong Golden duochrome. This shade is just beautiful. I used Three easy coats to build the shade up to opacity. That said, this color can also be layered. I'm not sure if this shade is meant to be a texture... But if left without top coat, it dries a bit gritty and cool looking. I did top coat it for my look though. This is one of my favorite shades in this entire collection. 
NOPI Sing you Like a Bee photo DSCN4614_zpsc66d28d0.jpg

 Thanks for stopping by my loves! 

Zoya Rue- Stamped Nail Art Look

$
0
0
(**Press Sample**)
Happy Humpday! 

 Today's post is something sweet and simple. Back when I was playing with the Zoya Naturel collection I found myself going on a "stamping over nude" kick. I think I mentioned this a few weeks ago, but I just love the look of a crisp stamp over a subtle base color. 
Zoya Rue Look photo DSCN3583_zpscff9d5e2.jpg
 This look started with a base of Zoya's Rue. Once my base color was dry I went ahead and added a stamp from Pueen plate Pueen33. I used my Konad Black special polish for the stamp. I then top coated my nails with Seche Vite and followed with a coat of INM Northern Lights for a hint of sparkle. Even though this is a simple look, there is something sort of chic about it. I really like this stamp design as well. 

Thanks for coming by! 

Nicole by O.P.I Carrie Underwood Collection Pinks & Corals Sparkling Ombre with Party Bus- Nail Art Look

$
0
0
(**Press Samples**)
Happy Thursday!! 

 For today's post I want to share this adorably girly obre look featuring the Pink and Coral shades from Nicole by O.P.I's Carrie Underwood Collection. For this look I also used the glitter topper from this collection. Sometimes less is more, right? 
Ombre with Party Bus. photo DSCN4496_zpsdeaf5ec2.jpg
 Even though there isn't much to say about this I just love how girly and fun these nails look. This ombre features (from Index to Pinkie): Some Hearts, Color me Country, Sweet Daisy and Southern Charm. These are all beautiful cremes with beautiful formulas. On my Pinkie and Thumb I did a dotted gradient using the Three Coral and Pink shades over Southern Charm. I topped the other Three nails off with Party Bus. Party Bus is a fun glitter topper made up of Silver prismatic hexes in varying sizes, and even some Flower shaped glitters. 
 I did have to do some fishing for the Flower glitters. I picked them out with a toothpick and placed them, then did a second coat of the glitter. To finish off my nails I did a top coat of Seche Vite. 

 I used Three coats of each color. The formulations on each shade is very buttery smooth and self- leveling. Some Hearts is a bright hot Coral creme. Color me Country is a sweet shade of Pink with slight Coral undertones. Sweet Daisy is a gorgeous shade of muted Coral creme. Southern Charm is a classic shade of Beige creme with slight Brown undertones. I am just in love with these shades. 
Some Hearts, Color me Country, Sweet Daisy and Southern Charm photo DSCN4459_zps73409852.jpg
 Thanks for stopping by today my loves!! 

Stay sparkly my beauties. 


Cult Nails Party Time French Tip Nail Art Look

$
0
0
(**Press Sample**)
Hello and happy Friday! 

 Today's look is something I've never done for the blog before.. A (somewhat) traditional French tip mani. I've done many a funky Frenches, but never one with my natural nail color showing through. I'm not sure what came over me, but I just had to do a French tip mani with Party Time by Cult Nails. 
Party Time French photo DSCN5072_zps8791283d.jpg
 Over my naked nails I did a base coat and then a coat of INM Northern Lights for the pretty sparkles. I didn't have to wait long to work on my French tips since my "base" was actually just a base coat and top coat. To get nice crisp French tips I used hole reinforcers. Like the kind I use for my half-moon manis, just placed at the tip of the nail to achieve a French tip. 
 The Blue shade I used is Cult Nails Party Time. This color is a beautiful, lively shade of Cerulean creme. Party Time can and will stain if not worn without proper base coat. I could care less though, it is just such an amazing color, with an impressive formula. 
 To add some super girly accents to my classic tips I added some cute little bow stamps from Pueen plate Pueen12, and Konad White special polish. I finished it all off by adding a top coat of KBShimmer Clearly on top and setting small light Blue stones into the centers of my bows. 

 Not even gonna lie.. I LOVE THIS!!!!! I also cannot believe it took me 3+ years of blogging to do a (fairly) classic French tip mani. I can definitely say this will not be my last French look. 

Happy weekend my loves! 
Viewing all 283 articles
Browse latest View live