Quantcast
Channel: Let them have Polish!
Viewing all 283 articles
Browse latest View live

Essie Sleek Stick Nail Appliques in Sea me Shine

$
0
0
(**Press Sample**)
Hello and good morning! 

 Today I want to share a quick manicure I did some weeks ago using some Essie Sleek Stick nail appliques. These are in the Sea Me Shine design. My experience with these decals was actually really pleasant. I didn't run into any issues with application, and the sizes of the appliques were perfect. It took me about 15 minutes to do all 10 nails. The best thing about these babies is the part where there is no dry time.  
Essie Sea me Shine photo DSCN3342_zps314abc6a.jpg
 I did apply a base coat to my nails before applying these. I did not top coat them. In previous attempts at wearing decals I had top coated them only to have the top coat ruin the decal itself. For this attempt I decided to skip the top coat and I had great success with wear time. I wore them for about a week.  These are a really cool design. They are kind of 3d and have cool circle glitter accents. They are a very bright "TARDIS" Blue, which was a bit hard to capture. To remove I just used the foil method like I would have to remove a glitter polish. 
Sea me Shine Macro photo DSCN3354_zpsad8b3b26.jpg
 I kept rubbing on my nails all week because the cool, bubble- like, accents felt.. well, cool. I also got many compliments on my nails while I wore these. I have a few more designs from the Essie Sleek Stick line and after trying these I am excited to try the rest. These were a really pleasant surprise. 

Thanks for stopping by!! 

KBShimmer Winter 2013 Multichromes Swatches & Video

$
0
0
(**Press Samples**)
Oh Multichromes ♥!! 

 Can KBShimmer make polishes or what?! Seriously, this girl has such immense talent for her craft. Back in winter of 2013 Christy released Seven new multichrome polishes. Three of these are smooth shifters and some have an added flash of holographic sparkle. There is also a Blue based shifting glassfleck. 
 I will warn you now... My skin tone looks awful in all these photos. My ultimate goal with these photos was to capture as much of the shift as possible. I was not concerned with my skin color. All photos were taken in the shade so that the shift would come through a bit stronger in photos.
 photo KBShimmerChromes_zps881a595e.jpg

 But, that said.. I did make this quick video which shows these babies in action. It was the best way I could think of to try and capture as much of the shift as possible. 

 To see close up swatches of these beauties just continue reading. 

 All swatches are Three coats of color. As you can see, they can be built up to full opacity on their own. That said, these can also be layered over just about anything as they are the right kind of sheer. My next venture will be to see them all over a Black creme. The formulas on all were very easy to work with, as usual with all KBShimmer polishes. 

KBShimmer Pigment of my Imagination- Smooth, Purple based, shimmering multichrome. This shade goes from a dark Grape Purple to Copper to Gold. At extreme angles is can also look Magenta. 
Pigment of my Imagination photo DSCN5375_zps452af7e6.jpg

Pretty in Punk- Green based shimmer with subtle linear Holographic shimmer. The color shift on this one is softer and goes from Green to Blue- Purple. 
Pretty in Punk photo DSCN5338_zps1659f234.jpg

Urban Camo- Smooth Emerald Green based shifting shimmer. The shift on this shade goes from Green to Blue to Golden Copper. 
Urban Camo photo DSCN5314_zpsc647099d.jpg

Myth you Lots- Purple based holo shifter. This one is along the same line of Pretty in Punk. The shift is from Purple to Magenta to Blue and Copper. The holographic effect is linear, yet subtle. 
Myth you Lots photo DSCN5288_zpse8747f95.jpg

Rollin with the Chromies- Light Blue based holo shifter. The shift here is from Blue to Pink and Purple. This pretty also has a subtle linear holographic sparkle. 
Rollin w the chromies photo DSCN5260_zps4ab00b8a.jpg

Maybe Navy- This pretty is a deeeep navy jelly based packed full of Midnight Blue, Pink, Aqua, Violet shifting glassflecks. As far as shifts go, this one has the least color changes. However, the particles themselves do change colors very noticeably. Those who are not huge on the multichromes might actually like this one quite a lot. 
maybe navy photo DSCN5242_zps2d27855f.jpg

Shade Shifter- Smooth Sapphire Blue based shifter. This pretty goes from a deep Blue to Violet, Magenta and Pink. 
shade shifter photo DSCN4106_zpsb9faa29a.jpg

 All of these beauties are still available from KBShimmer as well as other KBShimmer e-tailers. They retail for $8.75. I do ADORE these. I've been a fan of these types of shifters since I was introduced to Ozotic multichromes back in 2010. I cannot wait to do some funky nail art with these and some layerings as well. I love that Christy of KBShimmer did some Holographic and smooth shifters in this release as well as the glassfleck. It's just a beautiful collection. 

Which are speaking to you the most?

Delush Polish XO Trio Collection

$
0
0
(**Press Sample**)
Hi hello and happy Thursday! 

  Today I want to share my swatches of Delush Polish's newest releases. This is the XO Collection. This release is made of Three new shades just in times for Valentines :D. Two of these pretties are crelly- based glitters and one is a soft smooth shimmer. They are really cute and fun. All swatches are shown with a top coat for smoothness and shine. 

Delush Polish Love Me Lights Out- This pretty is a white crelly base. The crelly base is a tad opaque so if you don't keep a light hand you might find that the first layers of glitter are being covered up too much. This polish has a blend of Purple, Gold, Green, Lilac glitters in varying shapes and sizes, as well as neon Pink stars suspended in the White base base. I used Three coats for my swatch. While the polish is easy to work with, I did have some issues getting the larger Purple discs to come out. I really do love this though. It reminds me of little wildflowers. 
love me lights out photo DSCN5164_zps652ed8fd.jpg

Delush Polish Je Ne Se Quoi- This delicate beauty is a very light Pink crelly base. Packed in this soft Pink base are Rose Pink glitters in varying shapes and sizes, as well as soft mint Green and satin White glitters. The soft Mint touches added an unexpected element to this color that I really like. I used Three thin coats for my swatch. As with LMLO, it is best to keep a light hand to get the most out of the glitter spread. This shade also has a floral feel to me, very romantic. 
je ne se quoi photo DSCN5131_zpse7b78739.jpg

Delush Polish Make Me Blush- This shade is a soft tone of Ballerina Pink with a subtle Golden shimmer running through it. This shade reminds me of little Pink pearls. The formula is a bit streaky and sticky, a light patient hand is best. I used Three thin-ish coats for my swatch, the third coat made all the difference. I really dig this shade, very feminine and sweet. 
Make Me Blush photo DSCN5092_zpse47e882c.jpg

Delush Polishes feature a flat brush, which is always awesome. I also love that they have a matte Black cap that doesn't get all finger print-y (ahhhh the little things). Also, while I tend to hate Gold accents in my cosmetics packaging, I was surprised by how much I love the clean Golden graphic on Delush's bottles. Delush Polish is ran by the lovely Adriana. With each order you also get a cute scratcher card. You could get discounts on future orders or even getting to name your own shade! I got a 10% off discount on my future purchase. I think this is a really cool concept.
 The XO Collection trio is available from Delush Polish now. You can get the trio for $25.00.

I like this trio, the shades compliment each other really well. I really like Make me Blush and Je Ne Se Quoi. They are very romantic shades. 

Cult Nails- Road Trip Anyone? Collection Layerings

$
0
0
(**Press Samples**)
Happy Friday! 

  And just like that.. January is over! Today I want to share a few Cult Nails manis I wore last week. Both looks were done by layering shades from the Road Trip, Anyone? collection. If memory serves me right, this collection was released later in the Summer of 2013. They were limited edition. Looks like the only ones still on the Cult Nails site are All Out and Mayhem. However, Beautylish still has all these shades available through their shop.   

Cult Nails All Out- For this mani I decided to layer All Out over Be Loco. All Out is a beautiful micro shimmer topper. Over my Coral base it created a Sun kissed shade of Tangerine Orange. What I love about All Out is that it will transform any color into new, beautiful unexpected shades. Over lighter colors it looks beautifully Golden-Yellow, over Medium shades it can turn into a cool shade of shifting Lime Green and over darker shades it can go to this amazing shifting shade of Emerald Green. If you were a fan of Charlatan from the Deceptive Collection, you will love All Out. I used one coat over my base color. 
CN All Out photo DSCN4935_zpsd4503b36.jpg

Cult Nails Be Loco- This shade is many of my favorite things meshed into one polish. Be Loco is a perfect shade of true Coral with the most amazingly creamy formulation. This shade could have nearly been one coat. And yet, the formula was not thick or sticky or streaky... it was buttery smooth- perfection. This color is insanely flattering. I used Two easy coats for my mani. 
CN Be Loco photo DSCN4922_zpsfffa1038.jpg

Cult Nails Mayhem- This baby is a subtle Silver linear holographic topper. What I love most about Mayhem is that it adds beautiful holographic sparkle, that is very noticeable, without making the base color look muddy or cloudy. I've tried several toppers and I don't like how much they can cloud the base color. With Mayhem you get that beautiful effect, and you still get to see the base color clearly Just with the added beauty of Holographic shimmer. For this mani I layered Mayhem over Riot. I really loved this combination. Oh, and the Three- finger pic is not a new thing or anything. I dinged my Index nail as I was taking photos and I was so ready to be done this day that I just fixed it after I took photographs haha. I used one coat of Mayhem over Riot. 
CN Mayhem photo DSCN5437_zpsbf21fac4.jpg

Cult Nails Riot- This shade is a spectacular shade of clean Aqua- Teal. It is a bit lighter than teal, and a bit more Green than Aqua. Riot has an amaaazing formula as well. This shade could have also been one coat, I did use two though. I love this color to bits. It is summery, pool party perfection. The one downside is that this color can stain pretty badly.
CN Riot photo DSCN5412_zps13bedcae.jpg
 I wore both of these manis for about a week or so, no chips and very minor tip wear. The wear of Cult Nails polishes is always so impressive. If you are really digging these shades, they can still be found on the Beautylish Boutique and retail for $12.00/bottle.

Happy Friday everyone! 

#NailArtFeb Californails Challenge Day One: Glitter

$
0
0
(**Press Samples**)
Good Morning!! 

  Today I am starting a cool nail art challenge that will spread through the month of February. This challenge was put together by Californails. The challenge has a fitting, and hilarious name. This is the "Totally doable- I have a life! Challenge". Instead of daily prompts, this challenge gives us Three days between each design. The prompt for day One is glitter. I decided to go with a bridal- "Something Blue" theme for my glittery look. You can follow the hashtag #NailArtFeb on various social media outlets to see looks from many people participating. 
Nail Art Feb day One photo DSCN5656_zps100e91ad.jpg
 For this look I started with a base of Milani Aqua Brisk. I just love this fantastic shade of creamy Sky Blue. On my index and pinkie nail I did some freehand glitter placements. I went with a Silver to Aqua glequin gradient placement. On my Middle nail I did a coat of INM Northern Lights and then stamped in Sally Hansen Silver Sweep and Konad plate M77. I accented my stamp with a teardrop rhinestone. On my ring fingernail I did a coat of O.P.I In True Stefani Fashion and added a cute bow charm from Winstonia. This was my first time rocking nail charms, and I am charmed (badum tsssss). They add such a whimsical touch to the final look. To finish my nails off I did a generous coat of Seche Vite top coat.

 Just to comment really quickly on my glitter placement. I am really happy with how these turned out. The inconsistencies on my index nail were due to inconsistencies in the glitter sizes themselves. The pinkie nails turned out really good as I took a bit of extra time to make sure all the glitters were as close to shape and size as possible. I even went as far as to cut some of the glitters to fill in gaps at the cuticle line and free edges. My thumb matched the middle nail.

 If you want to join :D,
Californails Feb Challenge photo Screenshot2014-02-01at115556AM_zps2db93afc.png

 I'm very excited to take this challenge on! The prompts are really good and they are spaced apart just right :D. 

Thanks for stopping by loves! 

#NailArtFeb Californails Challenge Day Four: Polka Dots

$
0
0
(**Press Samples**)
Good morning and happy Tuesday! 

  Today is Day Four in the Californails Totally Doable- I have a life challenge. Day Four's prompt is one of my favorite things, Polka Dots. I went with all Pink Bettina shades for my dotted gradient look. Since the tag is #NailArtFeb, I'm trying to theme all the manis around Valentine's colors and such. I really like how these turned out :D. 
nail art feb day 4 photo DSCN5726_zpsf31d00d9.jpg
 This is a pretty basic look, but I love how the dotted gradient turned out over this adorable base color. My base color is Bettina Cotton Candy. For my dots I used Bettina Watermelon, Fruit Punch and Butterfly. In my photo I am holding Fruit Punch. I finished my nails off with Two coats of Seche Vite. 

Since I am actually caught up now, the "XOXO" prompt  will be going up on the 7th. 
Californails Feb Challenge photo Screenshot2014-02-01at115556AM_zps2db93afc.png
When in doubt; DOTS! 

Nicole by O.P.I- Carnival Cotton Candy & Goodbye Shoes Broken Lines Nail Art Tutorial

$
0
0
(**Press Sample**)
Happy humpday! 

  Today I have an odd color combination nail art look for you guys. These two Nicole by O.P.I shades come from the Carrie Underwood Collection. For some reason the odd mix of Cotton Candy Pink and muted smokey Green kept jumping out at me, so I decided to combine them into this quirky look. 
NOPI Carnival Cotton Candy & Goodbye Shoes photo DSCN4568_zpsa778a387.jpg
 This look started with a base of Carnival Cotton Candy. This shade is a lovely soft Pink with slight Blue undertones. Once my base color was dry I added some "broken line" accents on my middle and ring nails using striping tape and Goodbye Shoes. Goodbye Shoes is a muted shade of smokey, mossy Green. On my pinkie and index nails I did the spun sugar technique. I top coated my striped nails but left the sugar nails as they were to avoid altering the effect. 

 Here is Carnival Cotton Candy before any nail art was added. I only needed Two easy coats of this color for my swatch. The formula on both of these shades is fantastic and easy to work with. 
NOPI Carnival Cotton Candy photo DSCN4522_zps0a4500a1.jpg

And just for shigs, I actually did a mini pictorial on how to achieve the broken lines look with scotch and stripe tape. It is a pretty straight forward process, but if you guys have any questions, feel free to ask in the comments ♥. 
NOPI Lines Tut photo NOPILinesPt1_zps84990abc.jpg
Nopi Lines Tut photo NOPIStripesPt2_zps95b1c691.jpg
 I hope you guys enjoyed this look and tutorial. Even though it was a weird color combination, it really did something for me. They remind me of vintage decor for some reason. 

Thanks for stopping by today! 

Milani High Speed Fast Dry Shades for Spring 2014

$
0
0
(**Press Sample**)
Happy Thursday! 

  Today I want to share some swatches of the new Milani High Speed Fast Dry shades. In terms of Milani polishes, the high speed fast dry line is one of my favorites. The colors always have incredible formulas. They also really do dry quickly, and are fantastic for nail art. These three shades are definite wins for me :D!
Mil Spring photo Feb22014_zps9a4fdcc6.jpg

Milani Aqua Brisk- This shade is such an epic win! Aqua Brisk is your quintessential "Baby Blue" creme. The formula on this shade is very impressive. This shade could be one coat, but I did use Two. I am SO madly in love with this shade. I've been wearing this color as a pedi for about Four weeks now and it still looks great.  
Milani Aqua Brisk photo DSCN5647_zpsb46fd38f.jpg

Milani Sangria Rush- This shade is a beautiful, red toned Plummy creme shade. As with Aqua Brisk, this shade also has an amazing formula. I used Two coats for my swatch. 
Sangria Rush photo DSCN6044_zpsf1814b7f.jpg

Milani Blue Zoom- This shade is such an epic amount of WIN! Blue Zoom is a fantastic shade of light Cobalt Blue. The formula on this shade is slightly crelly and an absolute dream to work with. If you were/are a fan of Revlon's Royal, you will LOVE Blue Zoom. This shade also reminds me a bit of YSL's Blue Majorelle. I used Two coats for my swatch. 
Blue Zoom photo DSCN6125_zpsf405c2ce.jpg
 I love everything about these polishes. From the flat brush, to the buttery smooth formulations... They are just perfect. These also dry with a high shine and adding a top coat only makes them look even more amazing. 

 These shades are available now in CVS, Walgreens and Meijer stores as well as online. They retail for $4.99. 

Thanks for stopping by!! 

#NailArtFeb Californails Challenge Day Seven: XOXO

$
0
0
(**Press Samples**)
Hello and happy Friday! 

  Today is day Seven of the Californails "Totally Doable- I have a life" challenge. Today's prompt is XOXO. Initially, I had intended to attempt a freehand look. I must admit that my attempt did not go at all how I had envisioned. I'm still very intimidated by freehand nail art. So.. I went with an open interpretation of the XO theme. XO= kisses and hugs, right ;)? For this look I chose all Nicole by O.P.I shades from their 2014 core expansion. 
Nail Art Feb Day 7- XOXO photo DSCN6300_zps12386957.jpg
Index and Pinkie nails: These nails started with a base of I Shop Mintage. This dreamy shade of Mint Green is Spring perfection. For my "O's" I used That's Just Grape then I went back and dotted with I Shop Mintage to create little "O's". I topped my nails off with Seche Vite, followed by Twee & Honey This is Matte-ness top coats.  
Middle and Thumb nail: For these nails I started with a base of Teal me Something New, this shade is a fantastic shade of vivid Teal. This sucker stains badly. It is crucial to prep properly before wearing this shade. On these nails I did a stamp with Pueen plate Pueen41 and Konad White special polish. I topped these off with Seche Vite, then INM Northern Lights. 
For my Ring nail I started with a base of Something About Spring, which is a lovely, classic Hot Pink creme. I then accented with an all over kiss stamp from Bundle Monster plate BM303 and Konad red Special polish. I then added a little Black Kiss with Bundle Monster plate BM03. On top of my little Black Kiss I did a bit of INM Northern Lights to make the kiss stand out. To finish it off I did a coat of Seche Vite.

 Even though it is an "abstract" interpretation of the XOXO theme, I quite like these :D. They are so cheery and playful. The next prompt in the challenge is Hearts, which should be fun. 
Californails Feb Challenge photo Screenshot2014-02-01at115556AM_zps2db93afc.png

Thanks for coming by and happy Friday! 

#NailArtFeb Californails Challenge Day Nine: Hearts

$
0
0
(**Press Sample**)
Hi hello and good afternoon!! 

 Today's post is Day Nine of the Californails "Totally Doable- I have a life challenge". That said (lolol).. I won't be posting the prompts for days 11 through 14 until next week as I am out of town. The husband and I are moving... again haha. We are scoping out our new home this week, exciting stuff. 
 For today's prompt I went with a stamped look using a Pueen stamping plate from the Love Elements set and a Milani shade.  
Milani Hearts photo DSCN6365_zpsa1c847fc.jpg
 For some reason hearts have never been my "thing", but then again neither is Valentine's in general.. Which is why this challenge seemed so much fun. It is taking me out of my comfort zone and is actually challenging... which for me equals more fun. My base color is the adorable Milani Cupid's Touch. This shade was just released for Spring 2014. I used Two coats of color and then did a coat of INM Northern Lights for a sparkly Pink base. For my heart themed designs I used Pueen plate Pueen43 and Konad Back Special polish. I finished the whole look off with a coat of Seche Vite. 
Californails Feb Challenge photo Screenshot2014-02-01at115556AM_zps2db93afc.png
 So, the challenge prompts will pick back up next week. I hope you guys enjoyed this sweet and simple look :D. Thanks for stopping by! 

O.P.I Gwen Stefani Edgy Half Moon Nail Art Look

$
0
0
(**Press Sample**)
Good afternoon beautiful people! 

 Today I have an edgy half-moon nail art look featuring some of the new shades from O.P.I's Gwen Stefani collection. Half- moon nails are some of my favorite looks to combine finishes and edgy shades together. For this look I went with a Satin matte on gloss theme, mixing vampy and flashy, for an eye catching manicure. 
Stefani Moons photo DSCN5580_zps06883cec.jpg
 I started with Two easy coats of O.P.I I Sing in Color. Once my base color and top coat were dry I proceeded to tape off my moons using hole reinforcers. The beautiful satin matte shade of Gold is Love.Angel.Music.Baby. Since the color is so opaque it was perfect for this technique. I cleaned up the seam of my moons using a bit of Gold glitter striping polish. I did not top coat over the moons to avoid altering the matte against shiny look.
 The little Black stones and Gold stud bar are from the O.P.I Over and Over A-Gwen set. I used a toothpick to dab a bit of nail glue where I wanted the stud and also placed a teeny drop on the back of the studs and stones. The toothpick method made it easy to get the glue on precise spots and avoid making a mess. I wore this look for about Four days and didn't lose any stones or experience any chips. 

 I will be posting my swatches of the O.P.I Gwen Stefani collection very soon :D. I was definitely a "child of No Doubt". I grew up with Gwen's music so I immediately knew I'd have some kind of connection to these colors. I always remember loving Gwen's iconic Pink hair, long vampy nails and kick ass Red lippie. I'm was beyond excited to see Gwen collabing with such a fashion and music icon.

Who doesn't love a little  No Doubt!? 

O.P.I Gwen Stefani Collection Swatches

$
0
0
(**Press Samples**)
Happy Humpday!! 

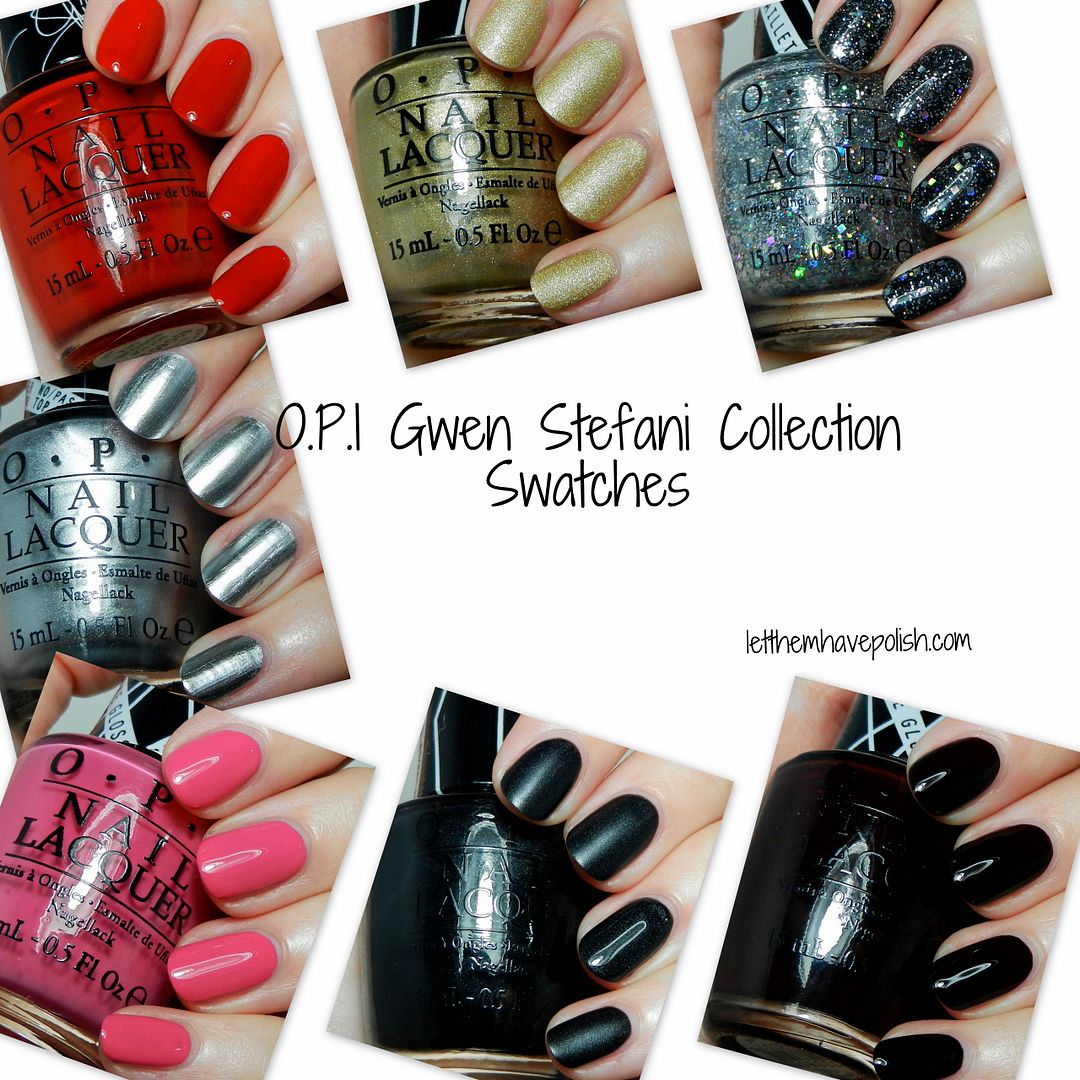
 Today I want to share my swatches of the O.P.I Gwen Stefani collection. I won't even lie. I was SOOOO excited to find out that O.P.I would be doing a collaboration with Gwen Stefani. She is such a music and fashion icon. But what I love best is that Gwen is one of the original "nail girls". I remember watching No Doubt music videos and always admiring her long vampy nails, Pink hair and fantastic Red lips. This collection is such a beautiful representation of Gwen's style. 

opi gwen photo opigwem_zps073fbb8a.jpg
 For close up swatches and more details just keep on reading. 


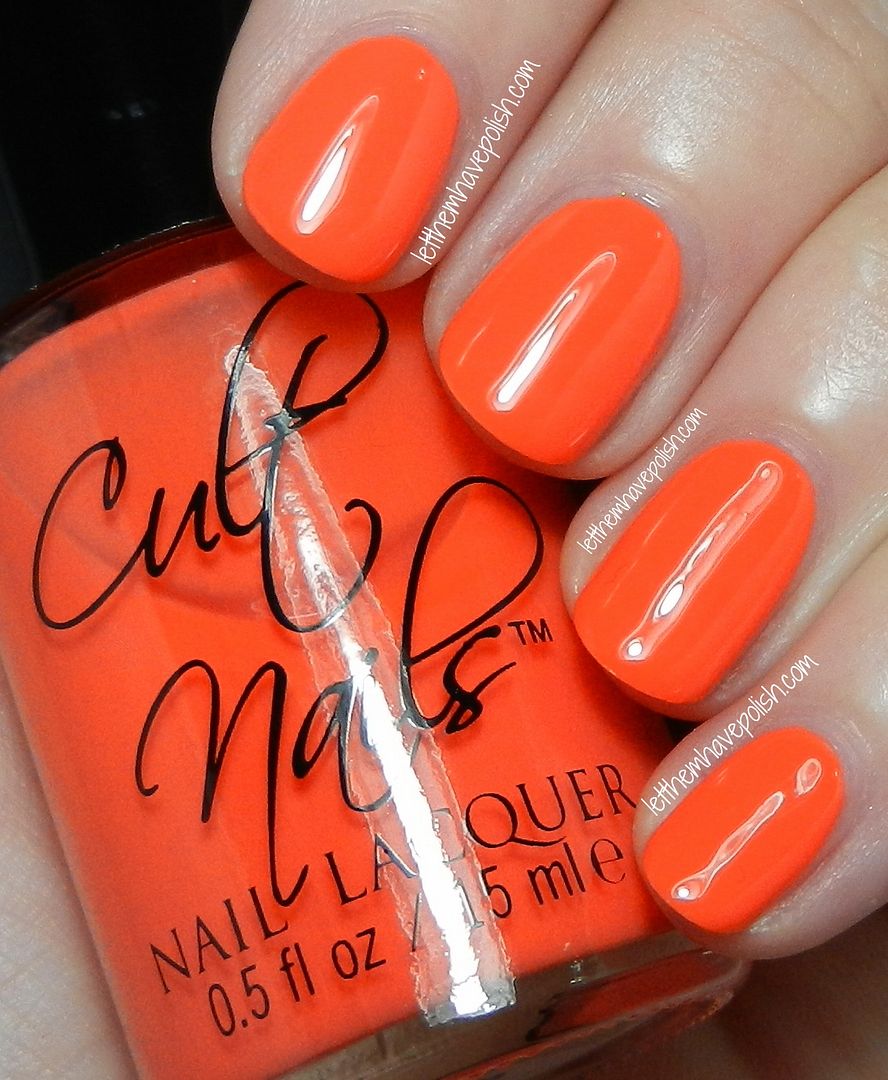
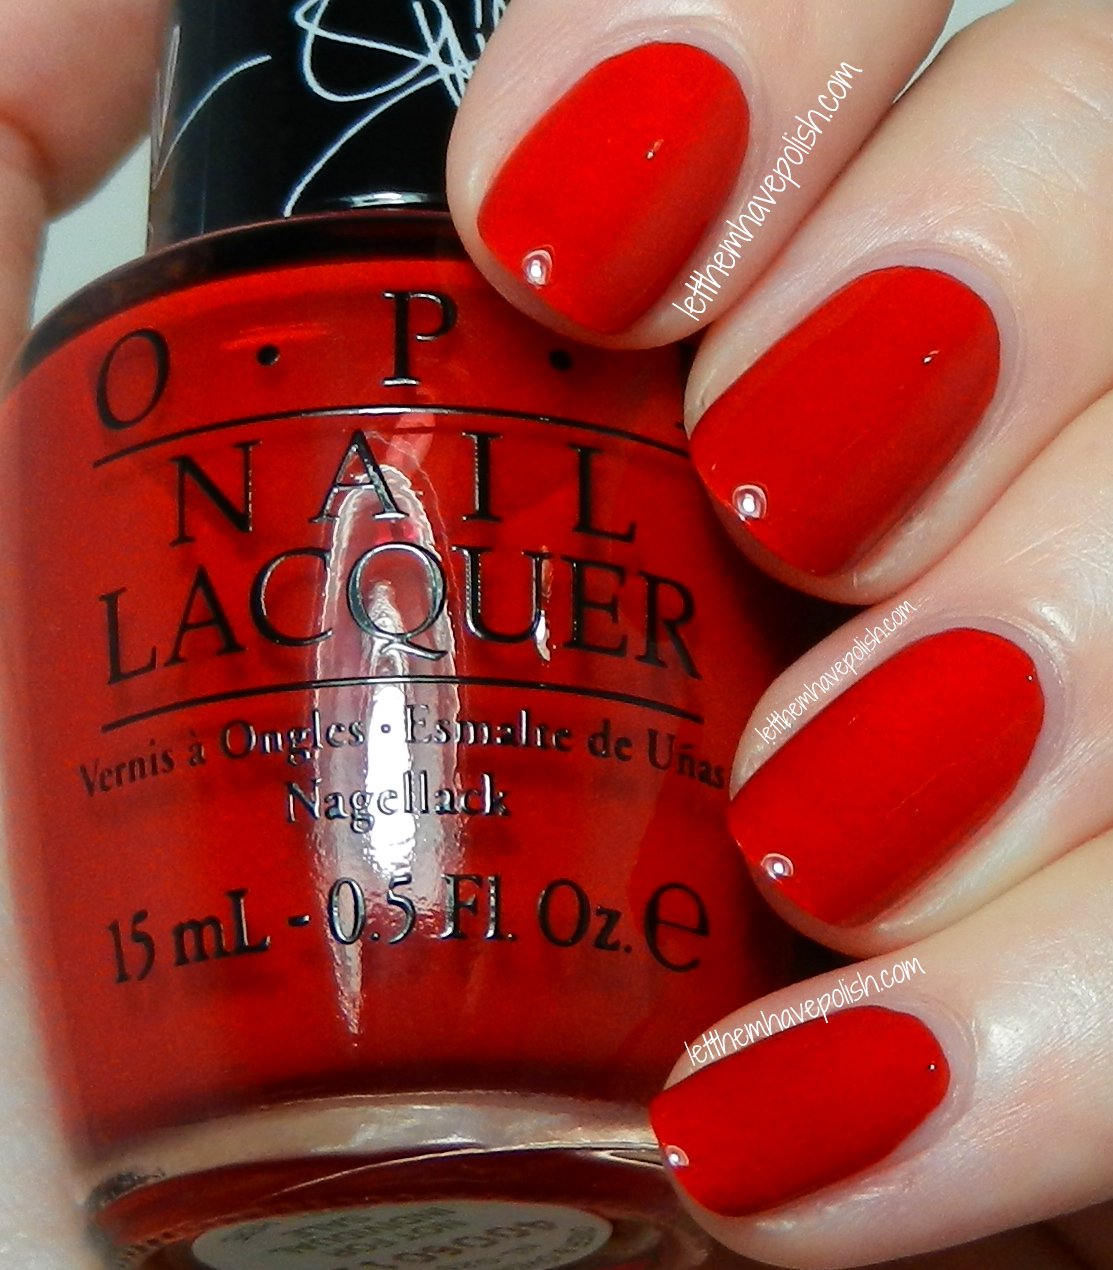
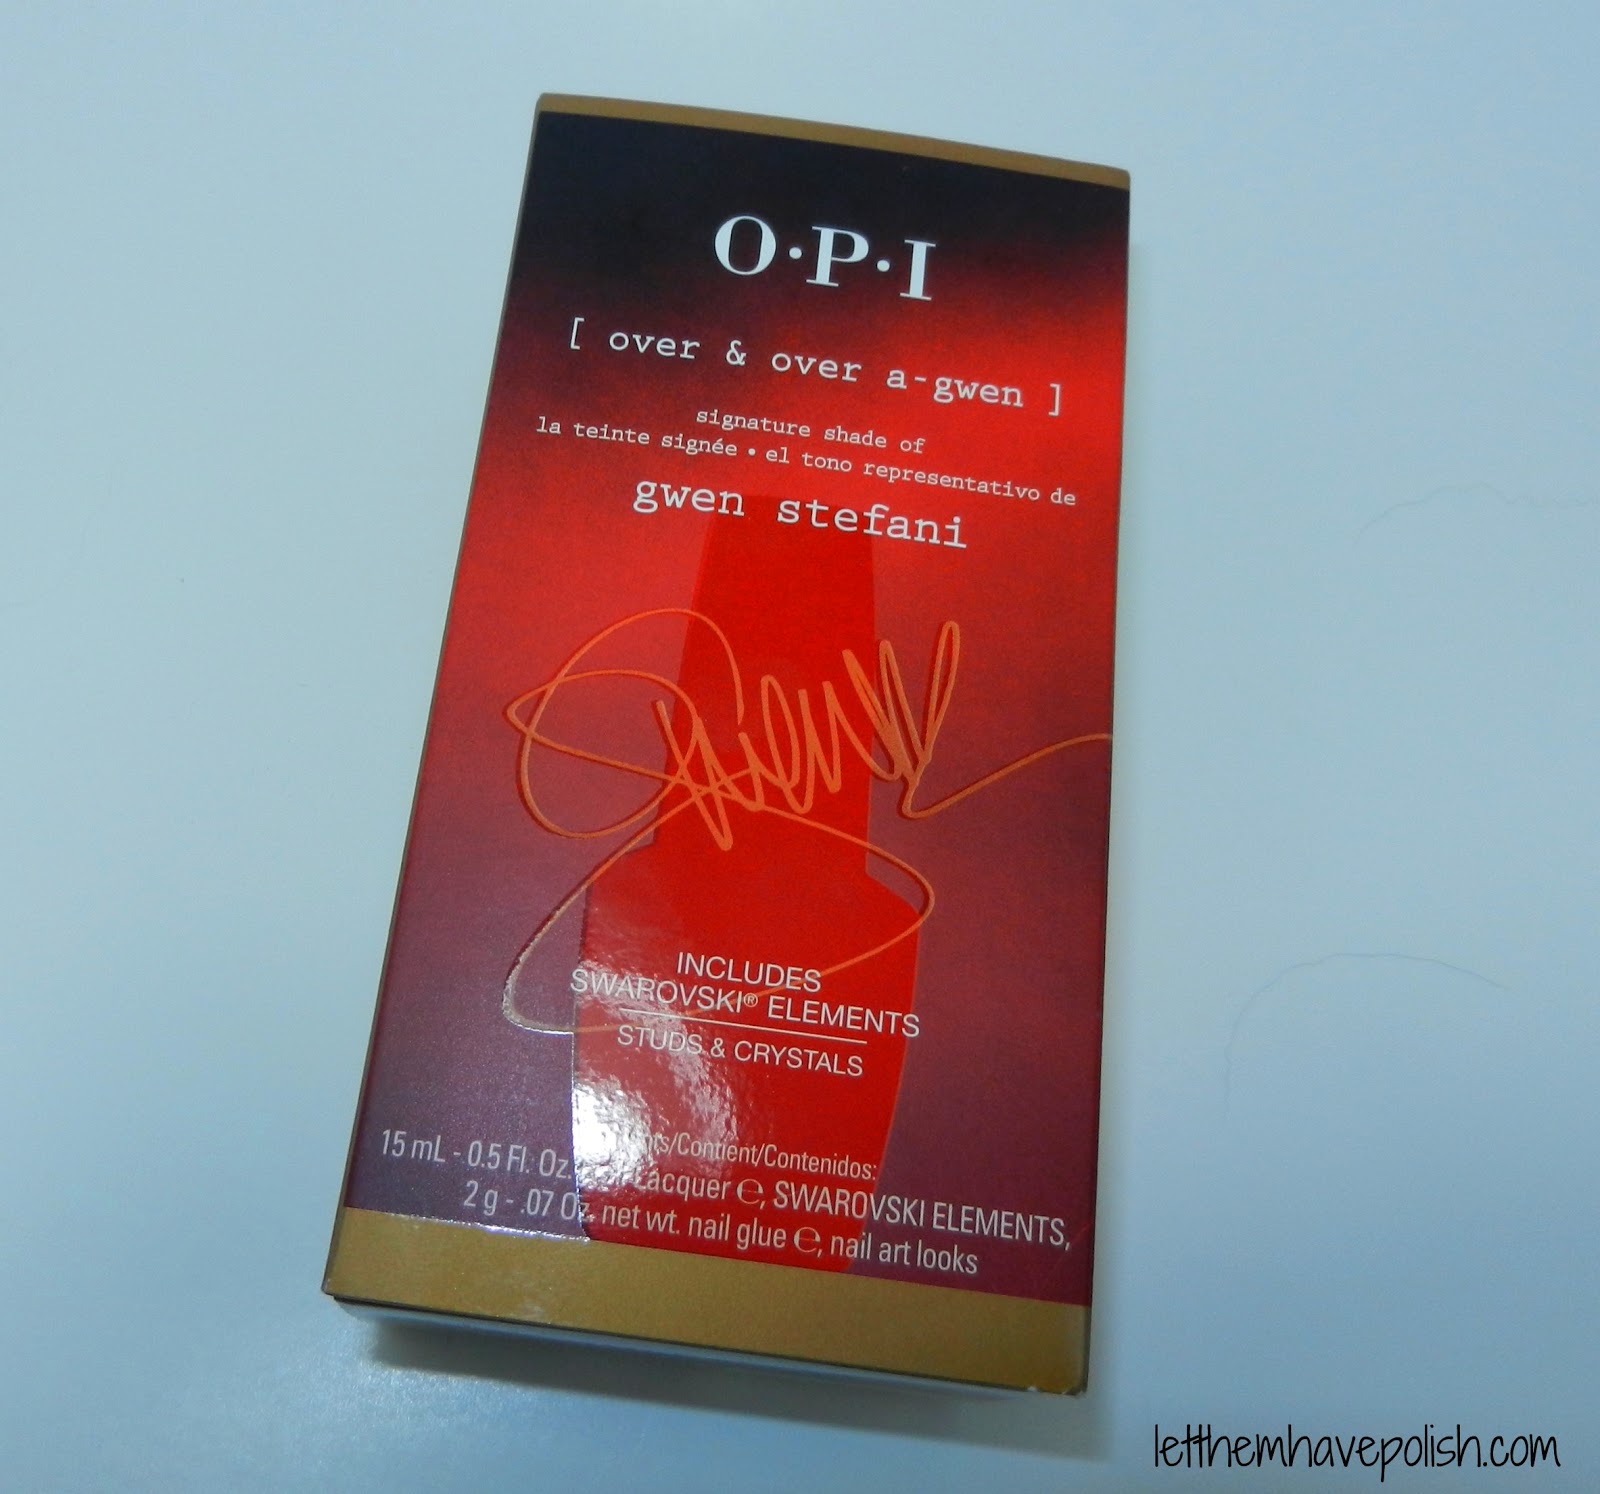
O.P.I Over and Over A-Gwen. This beautiful shade of Red is inspired by Gwen's signature Red lippy. Over and Over A-Gwen is a fantastic shade of balanced, uber shiny, Red creme. The formula is absolute perfection and does great in two coats.  This shade comes in its own individual packaging which also includes studs, gems and nail glue. 


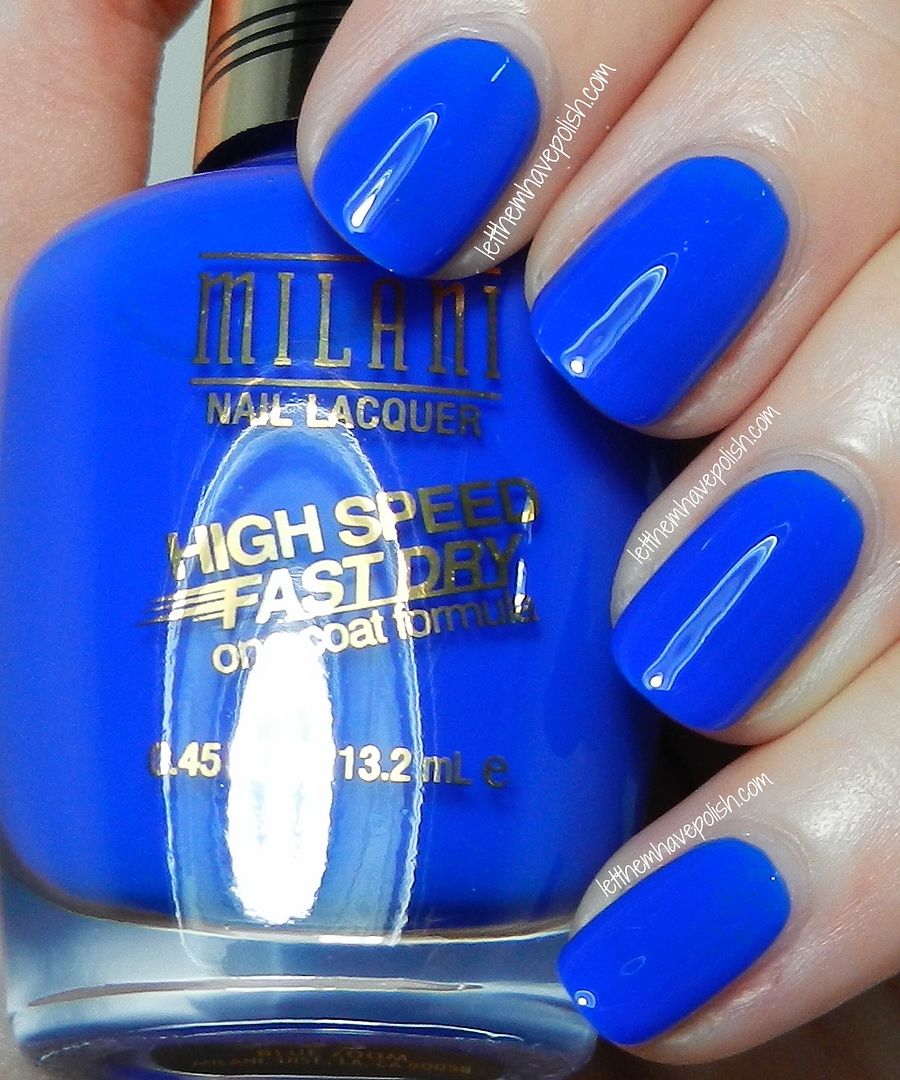
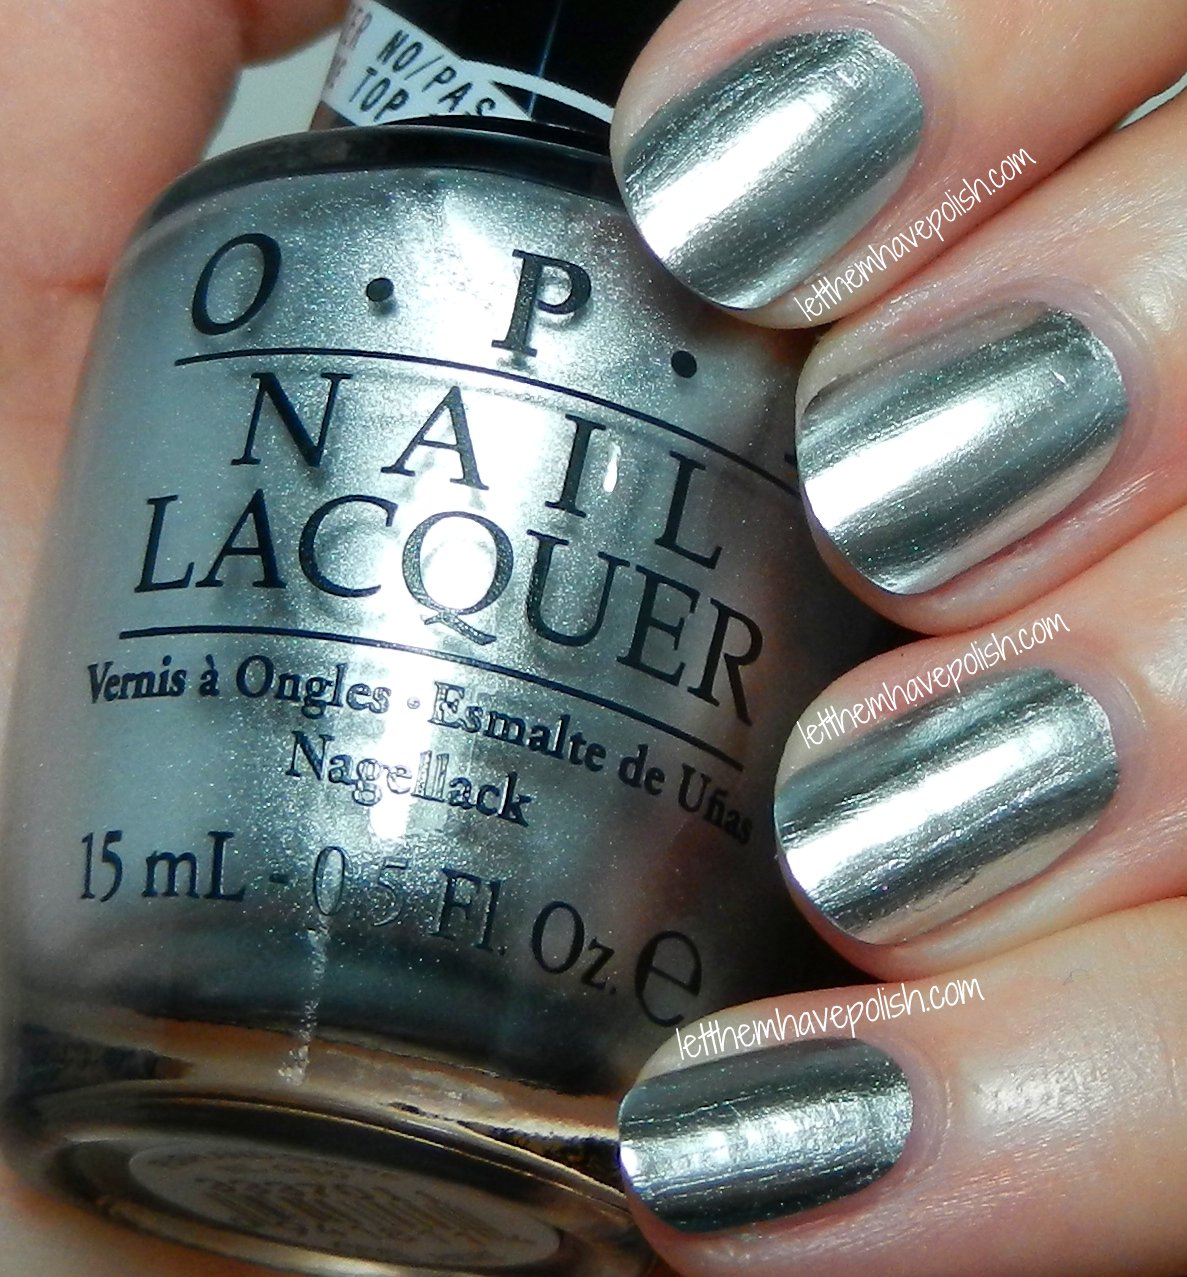
O.P.I Push and Shove. This shade has gotten a lot of hype as well as criticism. When this collection was announced/ marketed this shade was promoted a being a "mirror finish" chrome. Many people were disappointed to find that they could not see their reflections on their nails. 
 While O.P.I may have exaggerated claims a bit, I think that this polish is a fantastic innovation. While it is not a true mirror finish, it is definitely a smooth, metallic Silver chrome. The finish is extremely intense, shiny and futuristic. In a way it looks like when you smooth out aluminum foil. I am extremely, VERY impressed. Push and Shove comes with a mini bottle of a special base coat called Lay Down that Base. Push and Shove will not work without this special base coat. I have nothing like this polish in my collection.
 I was also very impressed by the application of this polish. I only used one coat of P&S for my manicure. It is best to buff nails to avoid the polish showing any imperfections on the nail surface. I wore my chrome nails for about 24 hours.  


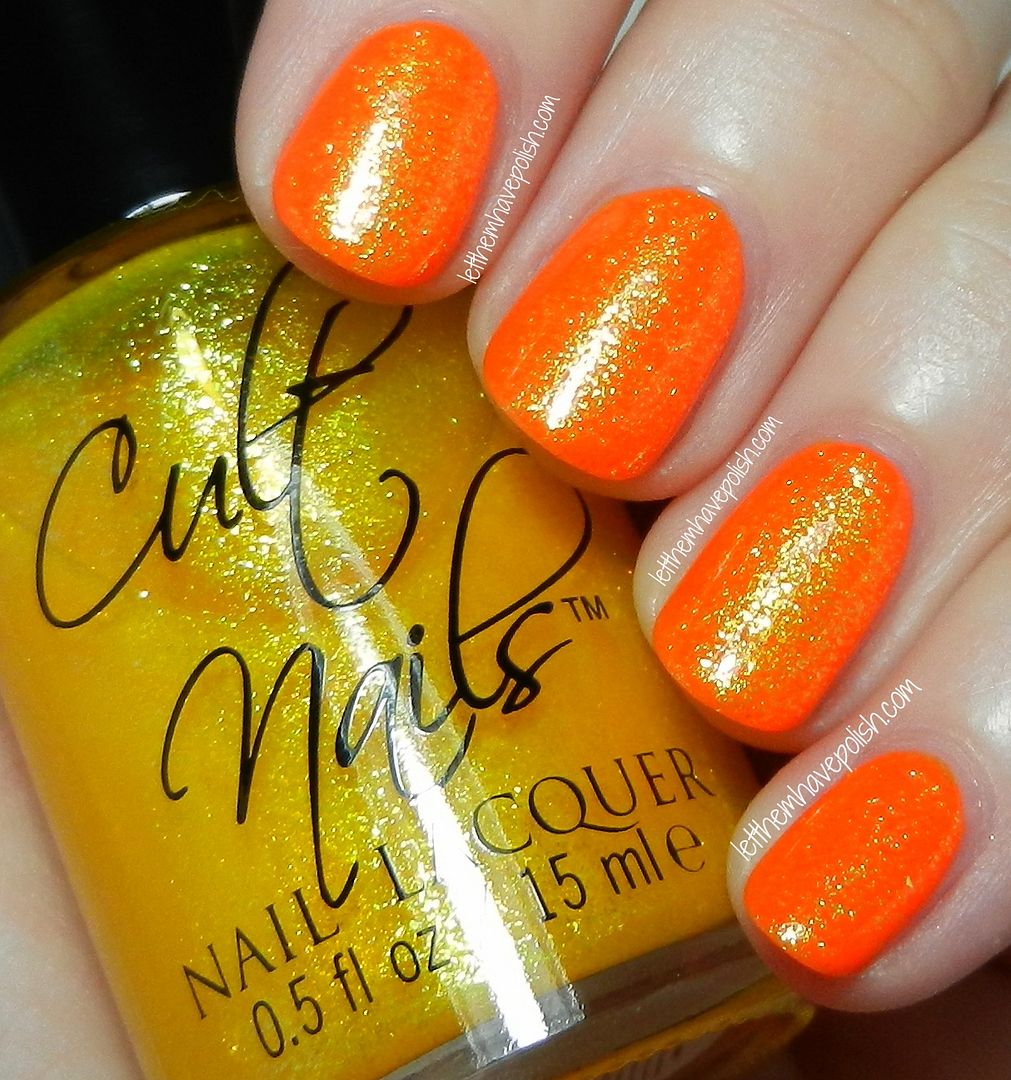
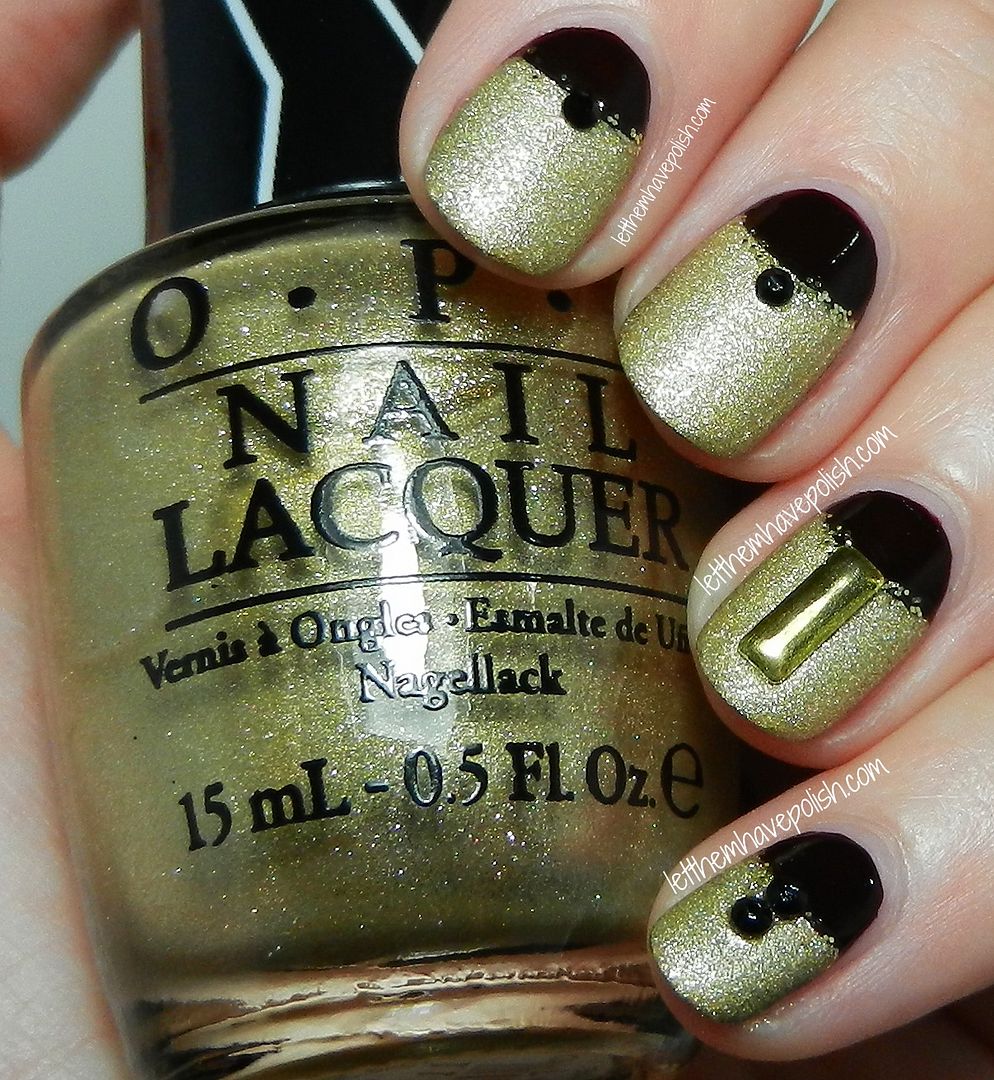
O.P.I Love.Angel.Music.Baby- This shade is one of the Two satin-mattes. L.A.M.B is a perfect shade of Golden- Yellow smooth shimmer. At a glance this baby looks almost holographic because of the intense micro shimmer that builds up so beautifully. The formula is smooth and perfect and does great in Two coats. 

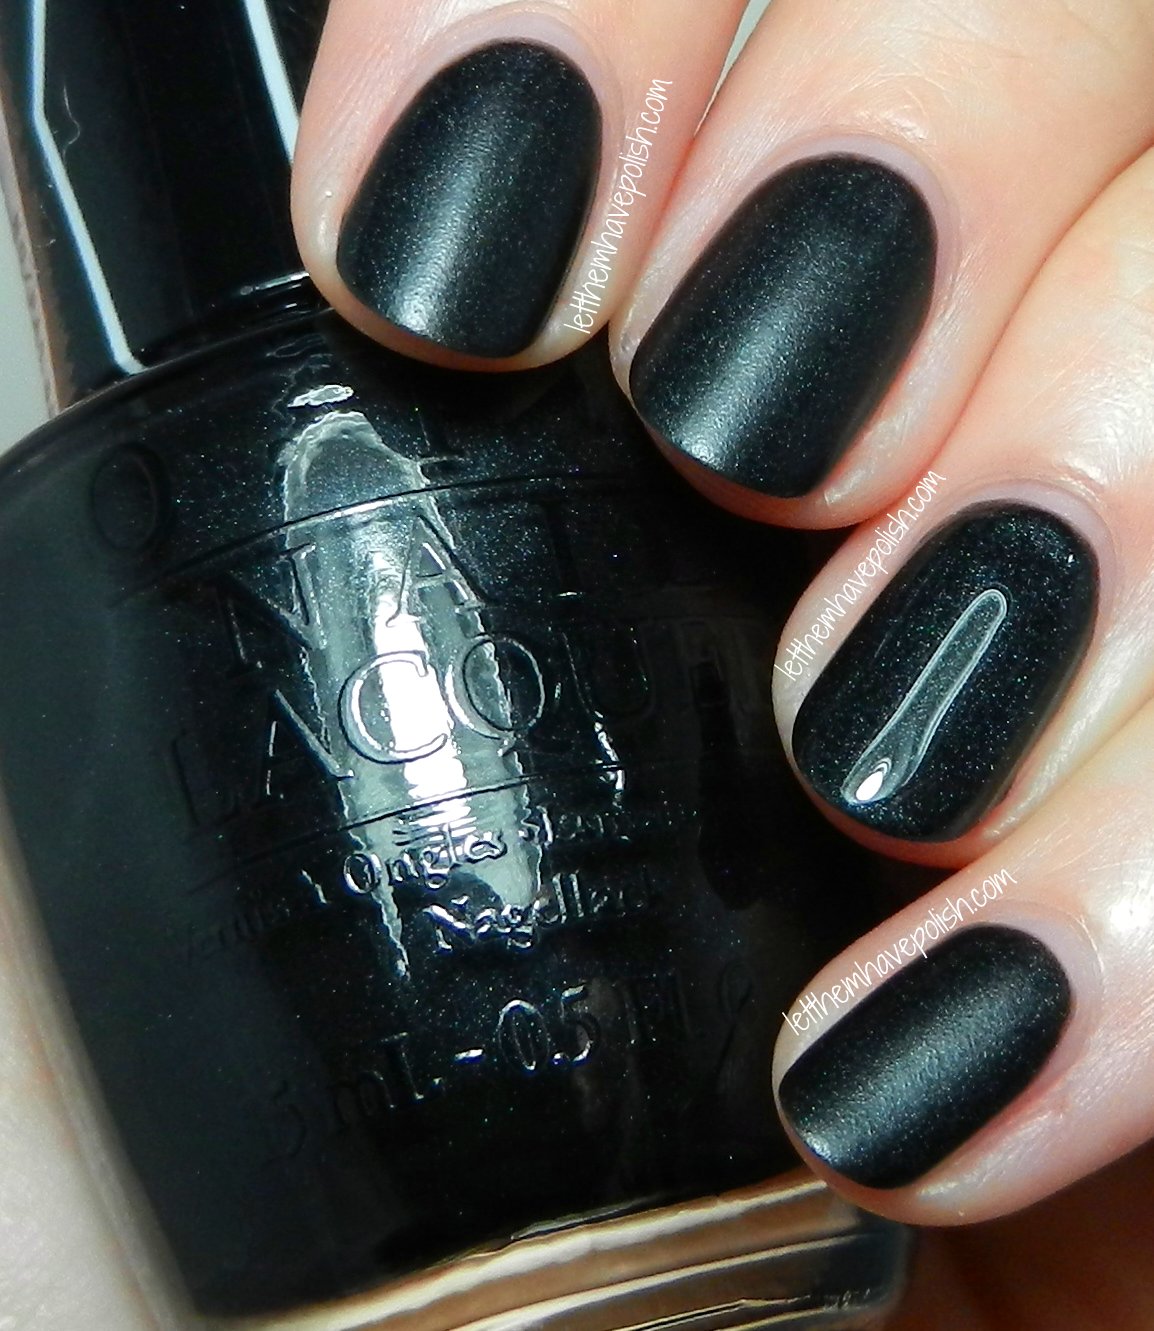
O.P.I 4 in the Morning- This is the second of the satin-mattes. 4 in the Morning is a fantastic shade of deep Graphite with subtle Silver micro-shimmer. This shade is unbelievably sexy and has a great formula. I used two easy coats for my swatch. For some reason I also decided to show one nail with top coat. O.M.GEEEEE! How beautiful is this color with some shine on it as well? 

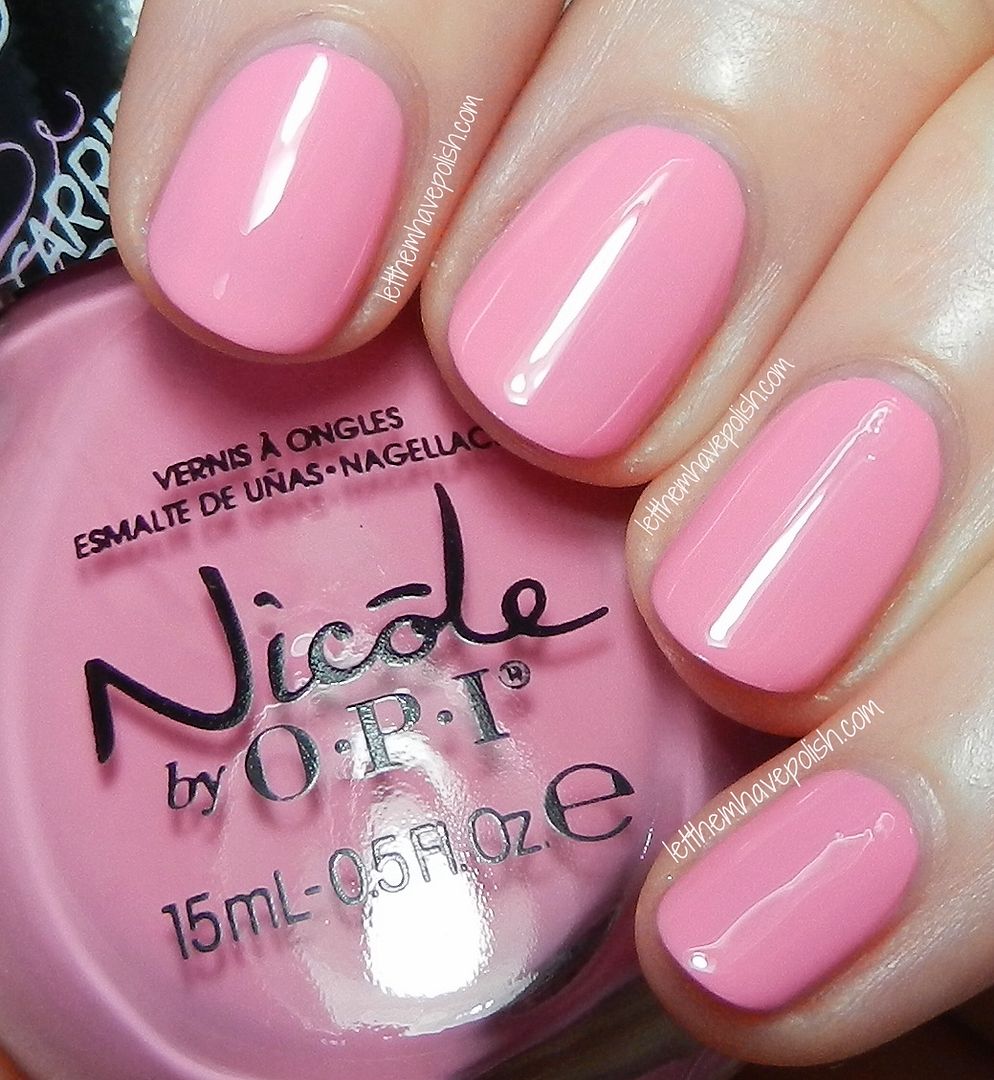
O.P.I Hey Baby- This shade is a classic and punky shade of Hot Magenta Pink creme. This shade isn't extremely unique, but it is really cute and has a great formula. I used Two coats of color for my swatch. 

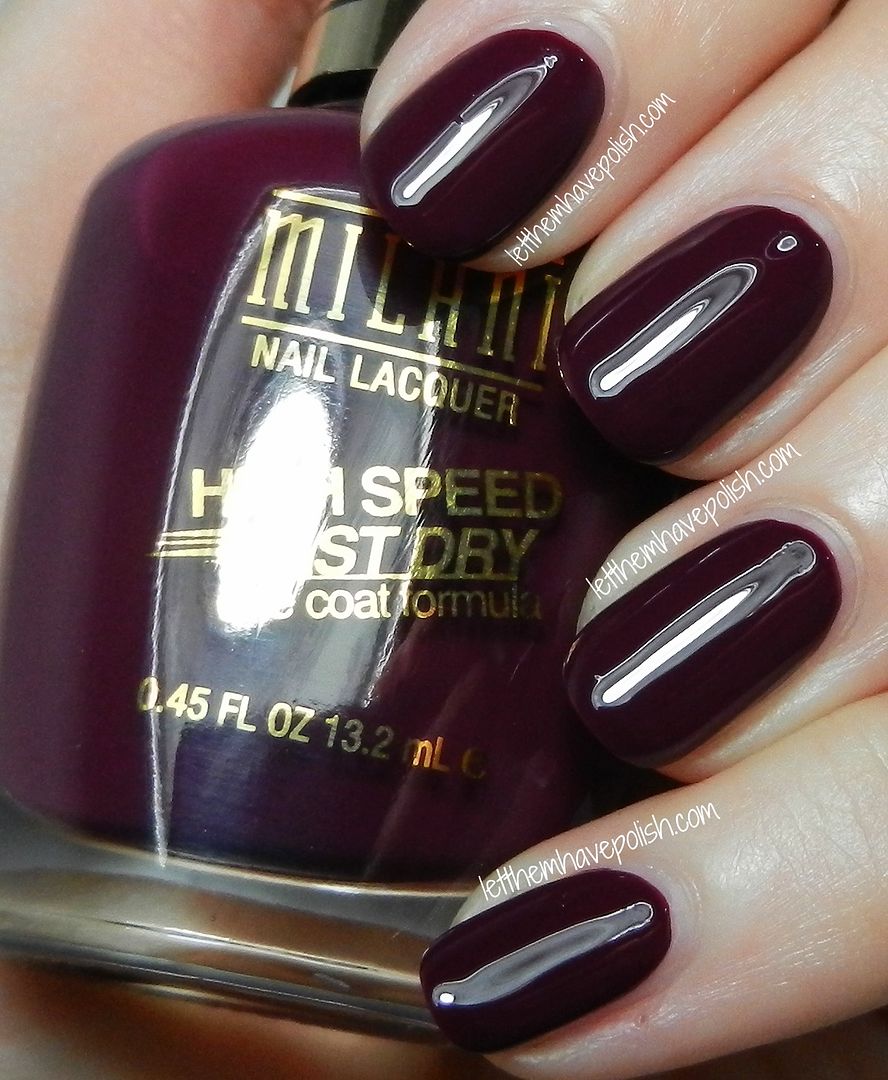
O.P.I I Sing in Color- This shade takes me back to the days of Tragic Kingdom. I Sing in Color is a classic shade of deep vampy Oxblood creme. I used Two easy coats for my swatch. This shade, along with all the other cremes in this collection, is very very glossy. 

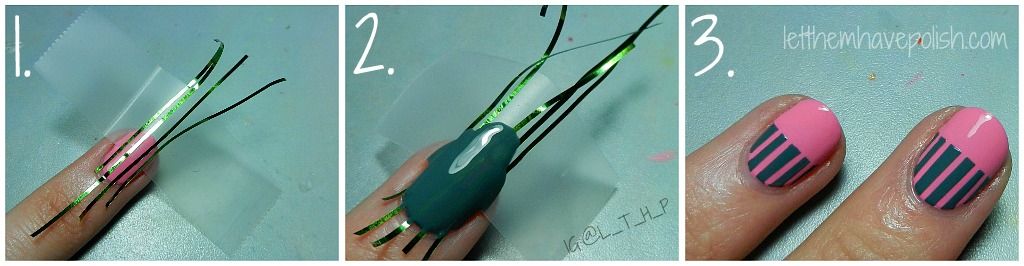
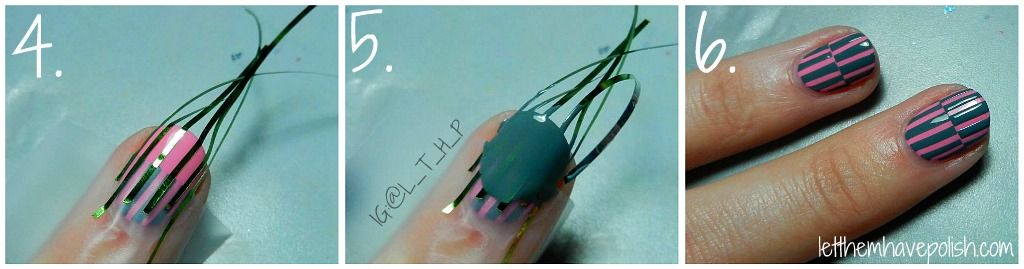
O.P.I In True Stefani Fashion over O.P.I 4 in the Morning- In True Stefani Fashion is a playful glitter topper made up of small and small square Silver and Silver prismatic glitter packed in a clear base. While I chose to layer it for my swatch, I think with enough patience this shade could be built up to opacity on its own. I do love the effect it creates when layered as it is very sparkly and gives a fun disco ball vibe to any mani. 
 This collection is available now. I am so madly in love with these shades. My faves here would have to be L.A.M.B, Push and Shove, In True Stefani Fashion and Over and Over A-Gwen. Even though many people think the signature Red looks a bit dupey, I can't find any dupes in my extensive stash. I think this is because Red polish isn't something I gravitate towards and don't have many of. 

What are your faves in this release? 

My Ultimate Mermaid Nails with Inglot Spangles

$
0
0
(**Press Samples**)
Hello and happy Thursday! 

 Today I want to share some of my favorite nails I have ever done. I'm calling these my ultimate mermaid nails. Back when I first received my set of Inglot nail and body spangles, I just knew this look had to happen. I'd also done a "disco mermaid" version of these some months ago for LTHP's birthday. These though!! THESEEEEE!!!! 
Ultimate Mermaid Nails photo DSCN6188_zps58c3c058.jpg
 For these ultra mermaid nails I started with a base of Milani's Blue Zoom. Once my base color was top coated and dry I started to work on my spangle placements. I worked on one nail at a time. I used a slow drying top coat and set my spangles in an overlapping pattern. Once I was done placing the spangles on all my nails I did a final coat of KBShimmer Clearly on Top top coat to seal my "scales". 

 I used Inglot Spangles in #23. These pretties have an amazing duochrome effect. They all shift from Sapphire Blue to Emerald Green and Copper at extreme angles. These were the perfect colors and shape for this look I had been dreaming of for months. These Inglot spangles are also very easy to work with :D. 
Ultimate Mermaid Nails photo DSCN6171_zpscc6b0f73.jpg
 I am so madly in love with how these turned out. They may have even come out better than I had envisioned. It is always such a great feeling to see a mani I had been wanting do come to life beautifully. 

Thanks for stopping by!!! I must go back in the water before my tail dries out though ;). 

#NailArtFeb Californails Challenge Day 11: Pastel

$
0
0
(**Press Samples**)
Hi everyone and happy Tuesday! 

  Today I'm picking back up with the Californails "Totally Doable- I have a LIfe Challenge". The next prompt I had to work on was "Pastel". While I was out of town last week, it was press sample mayhem back at my house. Within that mayhem was the wonderful Perfectly Poised, Spring 2014, collection by Seche. This collection is made up of Six beautiful pastel shades that were perfect for this prompt. 
 photo DSCN6690_zps35cb5689.jpg
 For this look I wanted to practice my freehand a bit. I kept it simple by freehanding some vertical stripes on my nails using all the shades from the Seche Perfectly Poised collection. For my base color I used Head to Toe, this is a shade of light Peachy-beige. I did top coat my base, just in case I had to wipe off my stripes or any mistakes. For my stripes I used Perfectly Poised(pastel Yellow), Keep it You (sweet Pink), Effortlessly Styled(pastel Coral), Buttoned Up(pastel Lilac) and Conquer the World(pastel Aqua). 
 All of these shades were wonderful  to work with. These all have creamy formulas, and are saturated with color. To finish my nails off I did a coat of Seche Vite, followed by a coat of INM Northern Lights.  

 The next prompt is to match my OOTD (Outfit of the Day), which I will be sharing tomorrow.
Californails Feb Challenge photo Screenshot2014-02-01at115556AM_zps2db93afc.png
Thanks for stopping by beauties! 

#NailArtFeb Californails Challenge Day 14: Match OOTD

$
0
0
(**Press Samples**)
Good evening loves!! 

 I'm trying to catch up on the prompts for the "Totally Doable- I have a life challenge" so I decided to post my OOTD prompt today as well. I won't even lie, I've been wearing my PJ's all day, every day for like Two weeks now... So I matched my nails to my PJ pants... yes, I did.
 photo DSCN6787_zpse50b1eaa.jpg
 I started with a base of Nicole by O.P.I  This Blue is so You. This beautiful shade of Navy Blue creme was a great match for my PJ pants. I freehanded some horizontal stripes using Nicole by O.P.I Sweet Surrender. I finished my nails off with a coat of Seche Vite. 
 photo DSCN6758_zps289729ff.jpg
Ta-dah!!!! PJ Nails :D hahaa. This is quite possibly the most lazy mani I've ever done haha. That said, I king of dug it a lot. My next prompt is "Studs", which I am excited about :D. 
Californails Feb Challenge photo Screenshot2014-02-01at115556AM_zps2db93afc.png
Have a good night my lovelies and I will see you soon!

#NailArtFeb Californails Challenge Day 17: Studs

$
0
0
(**Press Sample**)
Happy Pink Humpday! 

 Today I am sharing my look for day 17 of the Californails "Totally Doable- I have a Life Challenge". The prompt for today was "Studs". I was really looking forward to this prompt. I love playing with studs, but I rarely get to do so. I'm a huge fan of studded nails. My nails are pretty short right now, which made this a little extra challenging. I wanted to do something a little more elaborate, but studs tend to be too big for my tiny nails. However, I really have been loving the chunkier stud/gem looks so I figured I'd give one a go anyways. 
 photo DSCN6826_zps60c6545a.jpg
 For my look I started with a base of Salon Perfect's In Love. I used three easy coats. This shade of Pink is just lovely, and playful. I used studs from a wheel I got from Born Pretty Store to create a girly look. I used petal shaped studs to create my metallic Daisies :D. I topped everything off with some Seche Vite to seal my studs and smooth the surface. 

 The next prompt is "Floral". I am both excited and nervous for this prompt. I really want to do some freehand floral nails. In all the time I've been blogging, I've never done a freehand floral. As you guys know I've really been trying to push myself when it comes to trying more freehand nail art. 
Californails Feb Challenge photo Screenshot2014-02-01at115556AM_zps2db93afc.png

 Thanks for coming by today!! 

#NailArtFeb Californails Challenge Day 20: Floral

$
0
0
(**Press Samples**)
Hi hello and happy Thursday! 

  Today I want to share my look for Day 20 of the Californails "Totally Doable- I have a Life Challenge". The prompt for today is "floral". I really wanted to try my hand at a free hand floral look. I've never tried one, you guys know of my fear of freehand nail art. 
 That said, I had completely fallen in love with [THIS] look by Katy of Nailed It. Her tutorial is fab and easy to follow. I am not afraid to admit that this was my FOURTH attempt at this look. I am actually super happy with how these turned out. They are nowhere near as pretty as Katy's though. Still, they are definitely a good step forward toward overcoming my "fear" of freehand nail looks.
 photo DSCN6997_zps9c05f5d4.jpg
 I used all shades from the O.P.I Brazil collection. My base is Don't Bossa Nova Me Around. I really loved the contrast of vivid flowers against the muted base in Katy's tutorial, so I went for a similar vibe. For the flowers I used O.P.I Kiss me I'm Brazilian (Pink), and Toucan Do it if You Try (Coral). For the leaves I used Milani Showy Sea Green. The Black accents were done with Cult Nails Nevermore. I finished off with a coat of Seche Vite. 

 I'm really happy about how these turned out. I can't believe it took me four tries, this look really is very simple and easy to do. I was having a hard time with creating the "petals". I think I will be trying this look again soon. I really love this type of floral. 
Californails Feb Challenge photo Screenshot2014-02-01at115556AM_zps2db93afc.png
 I'm excited for the Animal Theme prompt. I think I want to revisit one of my older looks :D. Thanks for coming by today! 

O.P.I Hey Baby & In True Stefani Fashion Glitter Gradient

$
0
0
(**Press Sample**)
Happy Pink Friday! 

  It's a Friday quickie! Today I have a sweet and simple sparkly look using Two of the shades from O.P.I's Gwen Stefani Collection. When I first laid eyes upon In True Stefani Fashion I just knew it would make beautiful glitter gradients. 
 photo DSCN6490_zpsa8df67e8.jpg
 The base Pink color is O.P.I Hey Baby. I used a bit of cosmetic sponge to apply O.P.I In True Stefani Fashion to the tips of my nails. I finished my nails of with some Seche Vite to smooth out the sponging and bring out the sparkle. I so adore glittery gradients. They are a very easy way to spice up any mani. 

Thanks for stopping by and happy weekend! 

#NailArtFeb Californails Challenge Day 23: Animal Themed

$
0
0
(**Press Sample**)
Happy Tuesday everyone!! 

  I have been having SO much fun taking on this challenge by Californails. The prompts have been really fun to interpret. I also love that I had a few days between prompts to really give some thought to my next look. The prompt for day 23 is "animal themed". 
 Now, this look may seem familiar to some of you. Especially if you have been following LTHP for some time. Back in 2011 Sammy (The Nailasaurus), Rie (Nails and Noms) and I took on the 31 day nail art challenge and had so much fun doing it as a team and pushing each other to the finish line. One of the prompts in that challenge is "animal print" and [THIS] was the look I did back then. 
 To this day that is still one of my favorite looks (as well as most stolen picture lolol), and I had been really been wanting to recreate it.. So I figured it would be perfect to re- do this look for this challenge. It really begs to be said... Practice really does make perfect, or at least MUCH improvement :D.
 photo DSCN7069_zps2ef44f8a.jpg
 This look started with a base of Milani White. Which, as the name suggests, it is a clean, crisp White creme. Once my base was nice and dry I started working on my gradients. I used all Bettina shades for my gradients. Bettina shades are so ideal for SO many different types of nail art. They truly do shine when it comes to watermarbles and gradients. 
 On my Index and Pinkie gradients I used Bettina Pink Bikini, Epic and Yellow. For my middle nail gradient I used Bettina Vintage Jean, Purple and Pink Bikini. For my Ring finger gradient I used Bettina Yellow, Hopeful and Vintage Jean. To achieve the gradients I used a bit of cosmetic wedge sponge. I usually paint the colors onto the sponge and the work on my gradients. My technique is fairly similar to the one used in [THIS] tutorial. I will be making a video to show my technique soon.
 Once I was satisfied with my gradients I top coated them with some KBShimmer Clearly on Top and followed that with a coat of INM Northern Lights (of course!!). For the stamp I used Konad plate M78 and Konad Black Special Polish. I sealed it all off with a light coat of Seche Vite and called it a day. 

 Two years later and I am still SO in love with the final product... That said, I was  very temped to just leave my gradients with out the stamping. They looked so Summery and playful! 
Anima Theme photo DSCN7041_zpsa8d10903.jpg
 I hope you guys enjoyed this little stroll down LTHP memory lane. It is also amazing to see what a few years of practice can do for ones skill set. This is why I can't stress the importance of patience, time and practice enough. Seeing the improvement is always so encouraging, and gives me hope that someday I might actually get good at freehand designs! 

 The next prompt to take on is "Simple". Even though I have not been posting my designs "on time", I am still so happy to be almost done with this challenge. And not because I want to be done... More because I am actually seeing through to the end. I needed a swift kick in the bum to get motivated and this challenge has helped me a lot. 
Californails Feb Challenge photo Screenshot2014-02-01at115556AM_zps2db93afc.png
 Thanks for stopping by today my beauties!!! 

#NailArtFeb Californails Challenge Day 25: Simple

$
0
0
(**Press Samples**)
Hello my beauties an happy Humpday!

 Today I want to share my look for day 25 of the Californails "Totally Doable- I have a life Challenge". The prompt for day 25 is to do a simple look. Since I have been so enamored with the O.P.I Brazil collection for Spring-Summer 2014, I decided to use some of those shades. O.P.I knocked it out of the park with this collection. The colors compliment each other perfectly. I brought a few of them together for this scotch tape mani. 
Simple photo DSCN7197_zps88e43c46.jpg
 For this look I started with a base of Taupe-less Beach. Once my base was dry I used scotch tape to create uneven horizontal halves. I painted the exposed portions of my nails with I Just can't Cope-Acabana. This shade was a lovely surprise. For a Yellow creme, it has an amazing formulation. 
 Once my halves were dry enough I used some more tape to create some complementing "side panels". On my pinkie I used Amazon Amazoff, which is an amazing shade of rick Peacock Teal. On my Ring finger I used Live.Love.Carnival, which is a lovely shade of rich and vibrant coral. On my middle nail I did accents in Red Hot Rio, which is a classic shade of deep Ruby Red crelly. For my Index I used Where did Suzi's Man-go?, this shade is also used on my middle nail. I finished the whole look off with a coat of KBShimmer Clearly on Top. 

 I really adore this look. Sometimes simplicity can be so striking and fun. I had forgotten how effective scotch tape is for creating cool manis in a pinch. I feel like I have to say it again.... The O.P.I Brazil collection has my heart. I am so madly in love with the variety of this collection. There really is a shade for many different tastes. 
 The next, and final, prompt is to do Galaxies. I am PUMPED on that prompt. As much as I love galaxy manicures... I've only done Three on myself. So, this challenge giving an excuse to do one makes me very happy. 
Californails Feb Challenge photo Screenshot2014-02-01at115556AM_zps2db93afc.png
Thanks for stopping by!
Viewing all 283 articles
Browse latest View live